Zen Isolated Components in Android Architecture

A few years ago, we at Badoo started using the MVI approach to Android development. It was designed to simplify a complex code base and avoid the problem of incorrect states: in simple scenarios it is easy, but the more complex the system, the more difficult it is to maintain it in the correct form and the easier it is to miss a bug.
In Badoo, all applications are asynchronous - not only because of the extensive functionality available to the user through the UI, but also because of the possibility of one-way data sending by the server. Using the old approach in our chat module, we came across several strange hard-to-reproduce bugs, which we had to spend quite a lot of time to eliminate.
Our colleague Zsolt Kocsi ( Medium , Twitter ) from the London office told how using MVI we build independent components that are easy to reuse, what advantages we get and what disadvantages we encountered when using this approach.
This is the third article in a series of articles about the Badoo Android architecture. Links to the first two:
Do not dwell on poorly connected components.
Weak connectivity is considered better than strong. If you rely only on interfaces and not on specific implementations, then it will be easier for you to replace components, it is easier to switch to other implementations without rewriting most of the code, which simplifies including unit testing.
We usually end here and say that we have done everything possible in terms of connectivity.
However, this approach is not optimal. Suppose you have a class A that needs to use the capabilities of three other classes: B, C, and D. Even if you refer to them through interfaces, class A gets harder with each of these classes:
- he knows all the methods in all interfaces, their names and return types, even if he does not use them;
- when testing A, you need to configure more mocks ( mock object );
- It’s more difficult to use A repeatedly in other contexts in which we don’t have or don’t want to have B, C and D.
Of course, it is precisely class A that must determine the minimum set of interfaces necessary for it (interface segregation principle from SOLID ). However, in practice, we all had to deal with situations where, for the sake of convenience, a different approach was taken: we took an existing class that implements some functionality, extracted all its public methods into the interface, and then used this interface where the mentioned class was needed. That is, the interface was used not on the basis of what this component is required, but on the basis of what another component can offer.
With this approach, the situation worsens over time. Every time we add new functionality, our classes are linked in a web of new interfaces that they need to know about. Classes are growing in size, and testing is becoming increasingly difficult.
As a result, when you need to use them in a different context, it will be practically impossible to move them without all this tangle with which they are connected, even through interfaces. You can draw an analogy: you want to use a banana, and it is in the hands of a monkey that hangs on a tree, so as a result, in the load on the banana you will get a whole piece of the jungle. In a word, the transfer process takes a lot of time, and soon you begin to ask yourself why in practice it is so difficult to reuse the code.
Black Box Components
If we want the component to be easily and reusable, then for this we do not need to know about two things:
- about where else it is used;
- about other components that are not related to its internal implementation.
The reason is clear: if you do not know about the outside world, then you will not be connected with it.
What we really want from the component:
- define its own input (input) and output (output) data;
- Do not think about where this data comes from or where it goes;
- it must be self-sufficient so that we do not need to know the internal structure of the component for its use.
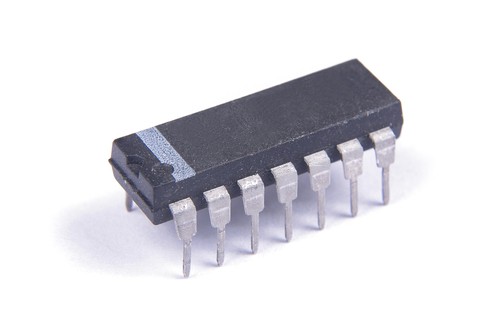
You can consider the component a black box, or an integrated circuit. She has input and output contacts. You solder them - and the microcircuit becomes part of a system that it knows nothing about.
Until now, it was assumed that we are talking about bidirectional data streams: if class A needs something, it extracts a method through interface B and receives the result in the form of the value returned by the function.

But then A knows about B, and we want to avoid this.
Of course, such a scheme makes sense for low-level implementation features. But if we need a reusable component that works like a self-contained black box, then we need to make sure that it does not know anything about external interfaces, method names, or return values.
We pass to unidirectionality
But without interface names and methods, we cannot call anything! All that remains is to use a unidirectional data stream, in which we simply get input and generate output:

At first, this may look like a limitation, but such a solution has many advantages, which will be discussed below.
From the first article we know that features (Feature) define their own input data (Wish) and their own output data (State). Therefore, it does not matter for them where the Wish comes from or where the State goes.
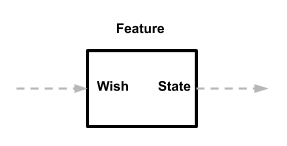
That is what we need! Features can be used wherever you can give them input, and with the output you can do whatever you like. And since features do not communicate directly with other components, they are self-contained and unrelated modules.
Now take the View and design it so that it is also a self-contained module.
First, the View should be as simple as possible so that it can only handle its internal tasks.
What kind of tasks? There are two of them:
- rendering ViewModel (input);
- triggering ViewEvents depending on user actions (output).
Why use ViewModel? Why not directly draw the state of the feature?
- (Non) displaying one feature or another on the screen is not an implementation detail. View should be able to render itself if the data comes from several sources.
- No need to reflect the complexity of the state in the View. The ViewModel should contain only the ready-to-show information that is needed to keep it simple.
Also, View should not be interested in the following:
- where do all these ViewModels come from;
- what happens when the ViewEvent is triggered;
- any business logic;
- analytic tracking;
- journaling
- other tasks.
These are all external tasks, and View should not be associated with them. Let's stop and summarize the simplicity of the View:
interface FooView : Consumer<ViewModel>, ObservableSource<Event> { data class ViewModel( val title: String, val bgColor: Int ) sealed class Event { object ButtonClicked : Event() data class TextFocusChanged(val hasFocus: Boolean) : Event() } }
An Android implementation should:
- Find Android views by their ID.
- Implement the accept method of the consumer interface by setting the value from the ViewModel.
- Set listeners (ClickListeners) to interact with the UI to generate specific events.
Example:
class FooViewImpl @JvmOverloads constructor( context: Context, attrs: AttributeSet? = null, defStyle: Int = 0, private val events: PublishRelay<Event> = PublishRelay.create<Event>() ) : LinearLayout(context, attrs, defStyle), FooView, // delegate implementing ObservableSource to our Relay ObservableSource<Event> by events { // 1. find the views private val title: TextView by lazy { findViewById<TextView>(R.id.title)} private val panel: ViewGroup by lazy { findViewById<ViewGroup>(R.id.panel)} private val button: Button by lazy { findViewById<Button>(R.id.button)} private val editText: EditText by lazy { findViewById<EditText>(R.id.editText)} // 2. set listeners to trigger Events override fun onFinishInflate() { super.onFinishInflate() button.setOnClickListener { events.accept(Event.ButtonClicked) } editText.setOnFocusChangeListener { _, hasFocus -> events.accept(Event.TextFocusChanged(hasFocus)) } } // 3. render the ViewModel override fun accept(vm: ViewModel) { title.text = vm.title panel.setBackgroundColor(ContextCompat.getColor(context, vm.bgColor)) } }
If not limited to Feature and View, here's what any other component will look like with this approach:
interface GenericBlackBoxComponent : Consumer<Input>, ObservableSource<Output> { sealed class Input sealed class Output }
Now everything is clear with the pattern!

Unite, unite, unite!
But what if we have different components and each of them has its own input and output? We will connect them!
Fortunately, this can be easily done with the help of Binder, which also helps to create the correct scope, as we know from the second article :
// will automatically dispose of the created rx subscriptions when the lifecycle ends: val binder = Binder(lifecycle) // connect some observable sources to some consumers with element transformation: binder.bind(outputA to inputB using transformer1) binder.bind(outputB to inputA using transformer2)
The first advantage: easy to expand without modifications
The use of unrelated components in the form of black boxes that are only connected temporarily allows us to add new functionality without modifying existing components.
Take a simple example:

Here, features (F) and View (V) are simply connected to each other.
The corresponding bindings will be:
bind(feature to view using stateToViewModelTransformer) bind(view to feature using uiEventToWishTransformer)
Suppose we want to add tracking of some UI events to this system.
internal object AnalyticsTracker : Consumer<AnalyticsTracker.Event> { sealed class Event { object ProfileImageClicked: Event() object EditButtonClicked : Event() } override fun accept(event: AnalyticsTracker.Event) { // TODO Implement actual tracking } }
The good news is that we can do this simply by re-using the existing output view channel:

In code, it looks like this:
bind(feature to view using stateToViewModelTransformer) bind(view to feature using uiEventToWishTransformer) // +1 line, nothing else changed: bind(view to analyticsTracker using uiEventToAnalyticsEventTransformer)
New functionality can be added with just one line of additional binding. Now we can not only not change a single line of code View, but it does not even know that the output is used to solve a new problem.
Obviously, now it’s easier for us to avoid additional worries and unnecessarily complicated components. They remain simple. You can add functionality to the system by simply connecting components to existing ones.
Second advantage: easy to reuse
Using the example of Feature and View, it is clearly seen that we can add a new input source or consumer of output data with just one line with binding. This greatly facilitates the reuse of components in different parts of the application.
However, this approach is not limited to classes. This way of using interfaces allows us to describe self-contained reactive components of any size.
By limiting ourselves to certain input and output data, we get rid of the need to know how everything works under the hood, and therefore we easily avoid accidentally linking the internals of components with other parts of the system. And without binding, you can easily and simply use components repeatedly.
We will return to this in one of the following articles and consider examples of the use of this technique for connecting higher-level components.
First question: where to put the bindings?
- Choose the level of abstraction. Depending on the architecture, this may be an Activity, a fragment, or some ViewController. I hope you still have some level of abstraction in those parts where there is no UI. For example, in some of the scopes of the DI context tree.
- Create a separate class for the binding at the same level as this part of the UI. If it's FooActivity, FooFragment, or FooViewController, then you can put FooBindings next to it.
- Make sure you embed FooBindings in the same component instances that you use in the Activity, fragment, etc.
- To form the scope of bindings, use the Activity or fragment life cycle. If this loop is not tied to Android, then you can create triggers manually, for example, when creating or destroying a DI scope. Other examples of scope are described in the second article .
Second question: testing
Since our component does not know anything about others, we usually do not need stubs instead. Tests are simplified to verify the correct response of the component to the input data and produce the expected results.
In the case of Feature, this means:
- the ability to test whether certain inputs generate the expected state (output).
And in the case of View:
- we can test whether a particular ViewModel (input) leads to the expected state of the UI;
- we can test whether the simulation of interaction with the UI initializes in the expected ViewEvent (output).
Of course, interactions between components do not magically disappear. We just extracted these tasks from the components themselves. They still need to be tested. But where?
In our case, Binders are responsible for connecting the components:
// this is wherever you put your bindings, depending on your architecture class BindingEnvironment( private val component1: Component1, private val component2: Component2 ) { fun createBindings(lifecycle: Lifecycle) { val binder = Binder(lifecycle) binder.bind(component1 to component2 using Transformer()) } }
Our tests should confirm the following:
1. Transformers (mappers).
Some connections have mappers, and you need to make sure that they correctly convert elements. In most cases, a very simple unit test is sufficient for this, since the mappers are usually also very simple:
@Test fun testCase1() { val transformer = Transformer() val testInput = TODO() val actualOutput = transformer.invoke(testInput) val expectedOutput = TODO() assertEquals(expectedOutput, actualOutput) }
2. Communication.
You need to make sure that the connections are configured correctly. What is the point in the work of individual components and mappers, if for some reason the connection between them has not been established? All this can be tested by setting up the binding environment with stubs, initialization sources and checking if the expected results are received on the client side:
class BindingEnvironmentTest { lateinit var component1: ObservableSource<Component1.Output> lateinit var component2: Consumer<Component2.Input> lateinit var bindings: BindingEnvironment @Before fun setUp() { val component1 = PublishRelay.create() val component2 = mock() val bindings = BindingEnvironment(component1, component2) } @Test fun testBindings() { val simulatedOutputOnLeftSide = TODO() val expectedInputOnRightSide = TODO() component1.accept(simulatedOutputOnLeftSide) verify(component2).accept(expectedInputOnRightSide) } }
And although for testing you will have to write about the same amount of code as with other approaches, however, self-sufficient components make it easier to test individual parts, since the tasks are clearly separated.
Food for thought
Although the description of our system in the form of a graph of black boxes is good for general understanding, this only works as long as the size of the system is relatively small.
Five to eight binding lines is acceptable. But, having connected more, it will be rather difficult to understand what is happening:
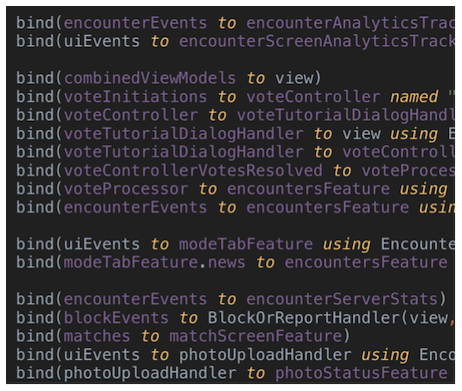

We were faced with the fact that with an increase in the number of links (there were even more than in the presented code fragment) the situation became even more complicated. The reason was not only in the number of lines - some kind of bindings could be grouped and extracted for different methods - but also because it became increasingly difficult to keep everything in sight. And this is always a bad sign. If dozens of different components are located at the same level, it is impossible to imagine all the possible interactions.
The reason is the use of components - black boxes or something else?
Obviously, if the scope you are describing is initially complex, then no approach will save you from the mentioned problem until you divide the system into smaller parts. It will be complicated even without a huge list of bindings, it just will not be so obvious. In addition, it is much better if the difficulty is expressed explicitly and not hidden. It’s better to see a growing list of single-line joins that reminds you of how many separate components you have than not know about those links hidden inside classes in different method calls.
Since the components themselves are simple (they are black boxes and additional processes do not flow into them), they are easier to separate, which means that this is a step in the right direction. We moved the difficulty to one place - to the list of bindings, one glance at which allows you to evaluate the general situation and begin to think about how to get out of this mess.
The search for a solution took us a lot of time, and it is still ongoing. We plan to talk about how to cope with this problem in the following articles. Stay in touch!
All Articles