Adding ZigBee Devices to Homebridge Using CC2531
There have already been articles on Habr on how to make ZigBee devices of various manufacturers with smart home control systems, without the use of branded hubs, such as Xiaomi Gateway. However, I did not find instructions for homebridge not only on Habré, but also on other Internet spaces. Therefore, I want to share the experience of adding ZigBee devices to homebridge. Many thanks should be expressed to the creator of the resource zigbee2mqtt.io , the methods for flashing the CC2531 modem and connecting to such smart home control systems as Home Assistant , Domoticz and Majordomo are already described there . The article is intended for users who already have homebridge installed and configured .

All actions in the article will be carried out with the following set of equipment:
Instructions for CC2531 firmware in Russian are here (via Pi) and here (via CCDebuger) .
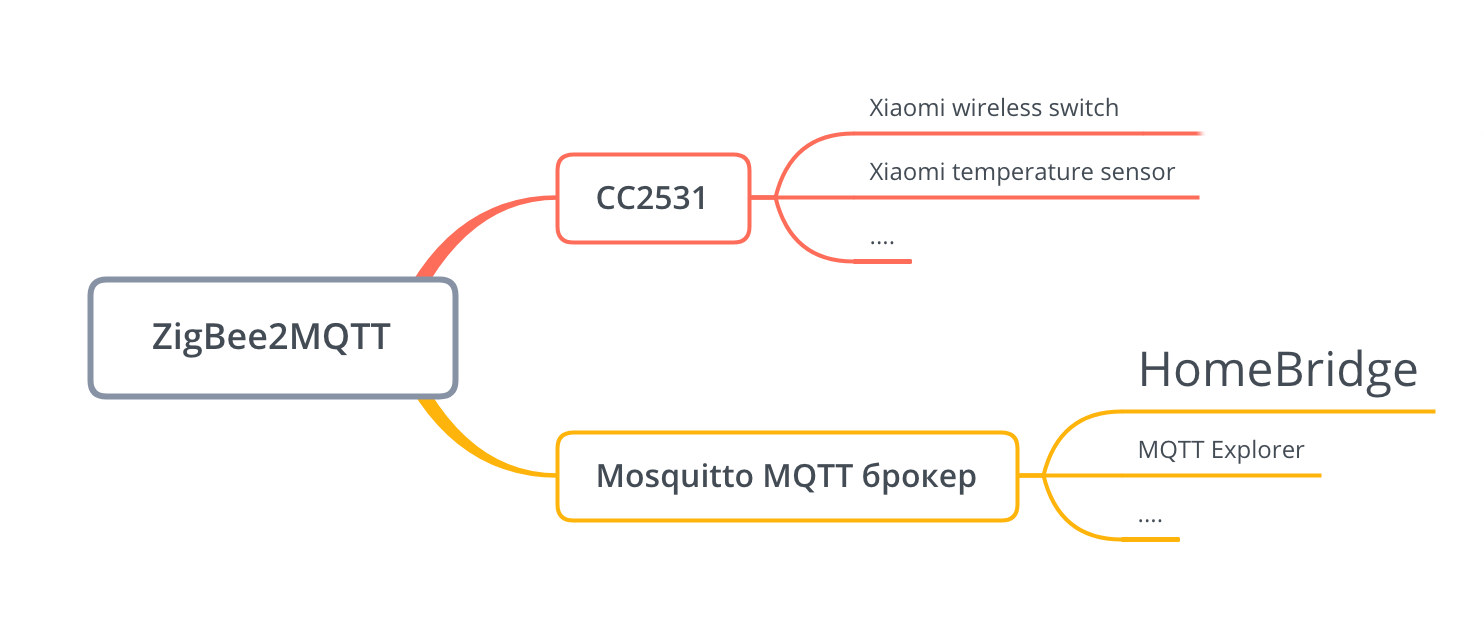
Schematically, the whole chain of work can be represented as follows:
Now in order.
After flashing the modem, you need to install the MQTT broker (if not already installed).
I use Mosquitto, installed like this:
More detailed configuration instructions can be found here .
Now you need to install the zigbee2mqtt service, which interacts with the CC2531 modem and transfers the data to Mosquitto:
In order to run zigbee2mqtt as a service, you need to create a file:
If you have already installed the MQTT broker, then you need to register the correct parameters for connecting to it in the file:
We start the service and add it to the autorun:
We look at the log:
You can start integration with homebridge. The zigbee2mqtt.io resource has a list of supported devices and instructions for creating a pair. For example, consider adding the Xiaomi Wireless Switch.
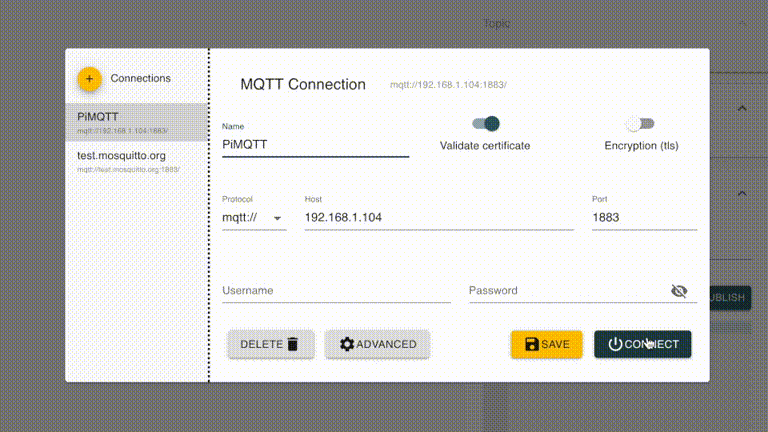
To view events in Mosquitto, use the MQTT Explorer program. We start, enter the address of the MQTT server, in my case it is located at
. If everything is installed correctly, then in the tree we will see the zigbee2mqtt branch. We pass into it. Now on the Xiaomi Wireless Switch, hold down the Reset button until the diode blinks (about 5 seconds). After about 10 seconds in the zigbee2mqtt branch, we will see our device and the data that it transmits.
If this does not happen, then after the diode blinks, try pressing Reset once with a frequency of per second. It should be like this:
Let's analyze the data:
The Click field contains the type of click; there can be five of them:
We learned how to receive data, now add the Xiaomi Wireless Switch to the homebrdige. To interact with MQTT, we will use the homebridge-mqttthing module . Installs in the same way as others:
The module supports a large number of classes of devices from switches to thermostats. For Xiaomi Wireless Switch, the
class is most suitable. To add, you need to know Topic
and the names of the commands. It turns out this kind of config:
By analogy, I added:
We check:

I used to use the homebridge-mi-aqara module, which adds ZigBee devices, interacting with Xiaomi Gateway. When Gateway is canceled, the response time of the devices decreased, in addition I got rid of the device that sits on my WiFi and constantly crawls on the Internet.
All actions in the article will be carried out with the following set of equipment:
- Raspberry Pi 3 B + (Raspbian OS)
- CC2531 Dongle (Stitched)
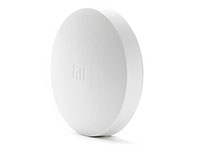
- Xiaomi devices (wireless switch, temperature & humidity sensor ...)
- MacBook Pro (OSX 10.14)
Instructions for CC2531 firmware in Russian are here (via Pi) and here (via CCDebuger) .
Schematically, the whole chain of work can be represented as follows:
Now in order.
After flashing the modem, you need to install the MQTT broker (if not already installed).
I use Mosquitto, installed like this:
sudo apt install -y mosquitto mosquitto-clients # sudo services mosquitto start # sudo systemctl enable mosquitto.service #
More detailed configuration instructions can be found here .
Now you need to install the zigbee2mqtt service, which interacts with the CC2531 modem and transfers the data to Mosquitto:
sudo git clone https://github.com/Koenkk/zigbee2mqtt.git /opt/zigbee2mqtt sudo chown -R pi:pi /opt/zigbee2mqtt cd /opt/zigbee2mqtt npm install
In order to run zigbee2mqtt as a service, you need to create a file:
/etc/systemd/system/zigbee2mqtt.service
with the following contents:
[Unit] Description=zigbee2mqtt After=network.target [Service] ExecStart=/usr/bin/npm start WorkingDirectory=/opt/zigbee2mqtt StandardOutput=inherit StandardError=inherit Restart=always User=pi [Install] WantedBy=multi-user.target
If you have already installed the MQTT broker, then you need to register the correct parameters for connecting to it in the file:
/opt/zigbee2mqtt/data/configuration.yaml
We start the service and add it to the autorun:
sudo systemctl start zigbee2mqtt sudo systemctl enable zigbee2mqtt.service
We look at the log:
sudo journalctl -u zigbee2mqtt.service -f
If everything is configured correctly, you should see these lines:
`permit_join` set to `true` in configuration.yaml. Allowing new devices to join. Set `permit_join` to `false` once you joined all devices. Zigbee: allowing new devices to join. Connecting to MQTT server at mqtt://localhost zigbee-shepherd ready Connected to MQTT server
You can start integration with homebridge. The zigbee2mqtt.io resource has a list of supported devices and instructions for creating a pair. For example, consider adding the Xiaomi Wireless Switch.
To view events in Mosquitto, use the MQTT Explorer program. We start, enter the address of the MQTT server, in my case it is located at
192.168.1.104
. If everything is installed correctly, then in the tree we will see the zigbee2mqtt branch. We pass into it. Now on the Xiaomi Wireless Switch, hold down the Reset button until the diode blinks (about 5 seconds). After about 10 seconds in the zigbee2mqtt branch, we will see our device and the data that it transmits.
If this does not happen, then after the diode blinks, try pressing Reset once with a frequency of per second. It should be like this:
Let's analyze the data:
{ "linkquality":110, "battery":100, "voltage":3052, "click":"single" }
The Click field contains the type of click; there can be five of them:
Click, double click, triple click, long, long_release
We learned how to receive data, now add the Xiaomi Wireless Switch to the homebrdige. To interact with MQTT, we will use the homebridge-mqttthing module . Installs in the same way as others:
(sudo) npm install -g homebridge-mqttthing
The module supports a large number of classes of devices from switches to thermostats. For Xiaomi Wireless Switch, the
StatelessProgramableSwitch
class is most suitable. To add, you need to know Topic
(0x00158d00022c85ea)
and the names of the commands. It turns out this kind of config:
{ "accessory": "mqttthing", "type": "statelessProgrammableSwitch", "name": "Xiaomi Single Button", "topics": { "getSwitch": { "topic": "zigbee2mqtt/0x00158d00022c85ea", "apply": "return JSON.parse(message).click;" } }, "switchValues": [ "single", "double", "long_release" ] }
By analogy, I added:
temperature and humidity sensor, touch sensor, presence sensor and switch.
"accessories": [ { "accessory": "mqttthing", "type": "occupancySensor", "name": "Xiaomi Occupancy Sencor", "topics": { "getOccupancyDetected": { "topic": "zigbee2mqtt/0x00158d000236b492", "apply": "return JSON.parse(message).occupancy;" } }, "integerValue": true }, { "accessory": "mqttthing", "type": "contactSensor", "name": "Xiaomi Contatc Sencor", "topics": { "getContactSensorState": { "topic": "zigbee2mqtt/0x00158d000278db8c", "apply": "return !JSON.parse(message).contact;" } }, "integerValue": true }, { "accessory": "mqttthing", "type": "statelessProgrammableSwitch", "name": "Xiaomi Single Button", "topics": { "getSwitch": { "topic": "zigbee2mqtt/0x00158d00022c85ea", "apply": "return JSON.parse(message).click;" } }, "switchValues": [ "single", "double", "long_release" ] }, { "accessory": "mqttthing", "type": "temperatureSensor", "name": "Xiaomi Temperature Sencor", "topics": { "getCurrentTemperature": { "topic": "zigbee2mqtt/0x00158d000201842c", "apply": "return parseFloat(JSON.parse(message).temperature);" } }, "history": true }, { "accessory": "mqttthing", "type": "humiditySensor", "name": "Xiaomi Humidity Sencor", "topics": { "getCurrentRelativeHumidity": { "topic": "zigbee2mqtt/0x00158d000201842c", "apply": "return parseFloat(JSON.parse(message).humidity);" } }, "history": true } ]
We check:
I used to use the homebridge-mi-aqara module, which adds ZigBee devices, interacting with Xiaomi Gateway. When Gateway is canceled, the response time of the devices decreased, in addition I got rid of the device that sits on my WiFi and constantly crawls on the Internet.
All Articles