A gift from Geek - we make a kitchen timer
Choose a gift
My son's grandmother will soon have a birthday. Since I was fascinated by microcontrollers, I got the idea to donate some device, of course, on a microcontroller and made with my own hands. Like all grandmothers, our grandmother is not an advanced user of any devices, and in principle she has nothing special about electronics. So, you can make any, not very complicated device.
When we come to visit her, we are always greeted by a rich table, with lots of dishes. Therefore, we immediately decided to make the device useful in the kitchen. Together we often play various board games - lotto, various games with dice. So, our device should help here.
After thinking a bit, the son decided to do an advanced kitchen timer . I helped him a little with the scheme. The main functions of our gift:
- Timer mode up to 3 hours
- Stopwatch mode
- Loud signal
- Compact size
- "Eternal" batteries - batteries, charging like a phone, via micro usb
- And of course the game is a cube (a random number from 1 to 6), a lotto, a bomb (a very fun game)
We select components
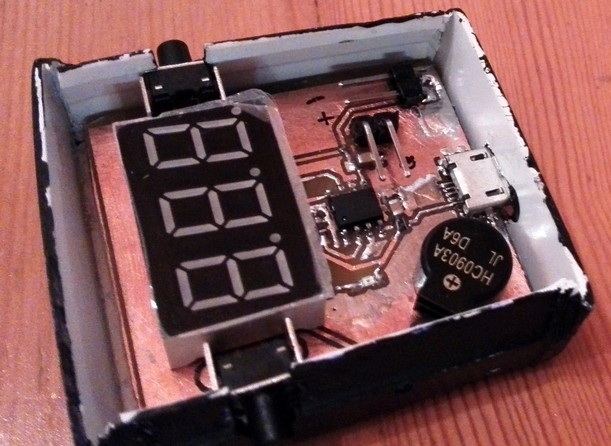
As an indicator, we chose a LED three-bit indicator with a common anode - it has only 11 terminals, very convenient. Buy is not difficult, and in principle, quite economical in energy consumption (but certainly not LCD).
The microcontroller - STM8S003F3P6 - we already worked with it, so everything is familiar. ST-link is already there.
The microcircuit of the charge and all the strapping of the MK, like a bike computer .

As a tweeter, very compact and loud tweeter HC0903A

Battery - LIR2032. Only 45 mAh, but this is enough for 40 hours of continuous timer operation. We decided to give up the quartz resonator (we need conclusions), we don’t need special accuracy, and the STM8 also has a fairly accurate internal oscillator. Charge chip - TP4056.
Management - 2 clock buttons. The device is always in sleep mode, the consumption is less than 5 μA, it can sleep for a long time. Protection board for the battery did not do, especially not needed. MK has a lower limit of 3B, so it will not slump much. When you turn on the music goes on, the indicator turns on (inrush current), and if the battery is dead, the MC will reboot and go into sleep mode, which is a signal to charge. It is charged with a current of 100 mA for about 40 minutes, which in principle is very fast. The scheme and the program can be downloaded on github, the link is at the end.
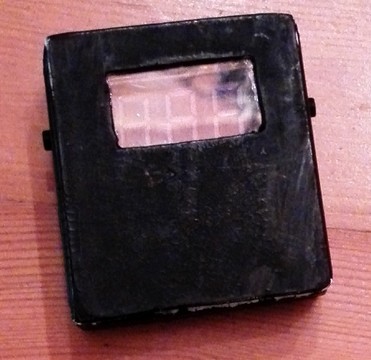
Body son decided to make himself out of the mounting box 40 x 16 mm. Painted with acrylic paints, cut out a piece from a DVD disc as glass. It turned out very nice.
Son traced the board himself in Kicad. The location of the component came up with it. The buttons on the sides of the indicator pishchalka below, the battery on it. Everything went tight, nothing dangles anything. The fee is two-way. Made from a one-sided fiberglass 0.8mm thick using the method of cold transfer of toner. The two halves of the board were connected and fixed with jumpers. From the connectors - micro usb, power and programming.
Program
This indicator has a common anode, so only one bit can be output at a time. To display three digits simultaneously, a dynamic indication is required.
Programmatically, this is done very simply. The timer is activated, and at regular intervals of time, with a large frequency, for example, every 300 μs, we will display one bit in a circle - 1-2-3-1-2-3. It will seem to us that the numbers glow at the same time, like in the movies. If you add more empty digits, you can control the brightness. That is, there will be such a scheme for displaying information - 1-2-3-empty-empty-empty-empty-1-2-3-empty-empty ... The brightness control is needed in order to reduce power consumption. Thus, for example, without the use of brightness, one discharge consumes 24 mA, and with the application it can be reduced to 1-2 mA. At the same time, the numbers are still clearly and far visible. The son played with frequency, brightness, when everything ceased to flicker, he liked it. It turned out that programming this type of indicator is quite easy and convenient.
The second difficult moment is to come up with a simple, as they say, intuitive interface, when we have 3 digits of the indicator and 2 buttons. But I think he succeeded.
Come up with buttons like this:
- Right button - long press, change of modes, there are three of them - Timer, Stopwatch, Games
- The right button is a single press, changing the submode. In the timer, this is the choice of the preset times, in the stopwatch, the choice of the normal stopwatch and with confirmation, in the game, respectively. Various games
- Left button - single press - start / stop or move in a game, long press - setting mode, programming
With an indicator like this:
- When a timer is selected, a certain number from the preset settings (for example, 5.15.30 minutes) is immediately displayed, they can be reprogrammed, stored in the ROM
- When the stopwatch is selected, then 000
- When games are L-lotto, 6 is a bomb, C is a die.
- The numbers are cleverly displayed on the indicator, since there are only three digits, then we derive the maximum number of significant elements. For example, the timer is 200 minutes 30 seconds - then we print 200., if the timer is 10 minutes 15s, then we output 10.1, if 1 minute 25s, then 1.25. At the same time, in order to understand that the timer or stopwatch is running, the dot flashes in time with seconds.
- When the stopwatch is stopped, for example, for 10 minutes and 25 seconds, then we alternately display 10. and .25, once a second, to see seconds too.
The program was not so simple, the son wrote it for almost 3 weeks during school time, with a little help from me. A lot of conditions, different flags - start, stop, work with memory, etc. But he was very pleased with the result.
Tests
The first tests were held at school. Instead of a cube, fortune telling on estimates. I wondered the whole class. Then the bomb is a super game. The device makes a random time of 5 to 20 seconds and starts ticking every second. You pass it in a circle. When the timer reaches zero - an explosion signal. The one with the device in his hands lost.
The first tests of the stopwatch and timer went off with a bang. Noticed at various times, checked with the exact clock, error 1-2 seconds per hour. Fulfilled the sound signal.
Gift giving
Has come birthday. Grandma quickly completed the training and was very pleased. Taken together, Lotto, fully automated. Every 5 seconds, the device beeps and gives out a new number from the remaining ones in the bag. They play everything, leads the device! Who did not have time he was late.
Results
So, the device turned out just great. The programming practice is very interesting. If you are also interested in microcontrollers, you can make yourself (or as a gift) the same and program it. You will definitely learn:
- make fees
- solder smd components
- STM8 programming
- work with batteries
- handle buttons
- make different sounds
- work with timers and handle time events
- fight power consumption
On github laid out the scheme and the board in the format Kicad. The initial project for STM8 is laid out, the most difficult is the dynamic display, the initialization of the microcontroller, and the complex processing of the buttons - a short, double, long press. I propose to write the rest of the program on your own, this is so interesting!
All Articles