Choose and collect 60% keyboard

In this article I will not describe the advantages and disadvantages of mechanical keyboards. There is no one perfect keyboard for everyone. Many consider the “island” keyboards with a scissor mechanism to be the pinnacle of development, someone can comfortably type only on Topre, others have stocked up with a couple of IBM Model M for the rest of their lives. Around the Cherry MX switches and their clones, the range of preferences is also very wide - one give light linear switches, others need hard MX Green with a click. It will be a question of a compact version, so-called “sixty percent keyboards”.
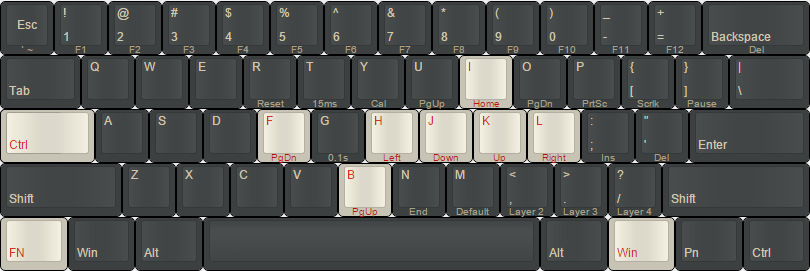
Vortex Pok3r Keyboard Layout Source of
What for?
60% of the keyboards are a further development of the idea of TKL keyboards ( ten keyless , without nampad) - the F-keys, arrows and the whole block above them with PageUp, PageDown and other keys are removed. Why do we need such keyboards when the full-size ones fit perfectly on the table? This question is answered in detail by one of the authors of Geektimes in the HHKB (Happy Hacking Keyboard) keyboard review . Standard full-size layouts were created in the actual “house-dwelling” era, and currently cause some inconveniences to some users. The main thing is that the mouse and keyboard constantly compete with each other for free space, we either stretch far to the right for the mouse, or shift the keyboard to the left, reducing the convenience of typing.
Secondly, the hands constantly go far away from the main working area, from the very F and J keys with protrusions. We drag right and down for the arrows, right for PageUp and PageDown. Delete is not so far, but it could be closer. Most of these inconveniences are unfamiliar to Vim fans, but they have to reach for the Escape in the upper left corner.
The author is sebchiken. Source of
As is the case with the choice between mechanical and scissor keyboards - 60% is not at all a universal standard, which simply must be comfortable for everyone.
The “keyboard renaissance” of the 2010s was the cause of the appearance of species diversity, among the various form factors and layouts you will surely find what suits your needs. You do not understand how you can do without the dedicated F-keys and arrows, but a little narrower than TKL? Please have 75% of the keyboard with arrows, PageUp, PageDown, Home and End. Need extreme minimalism? Cut off and get 40% or even 30% of the keyboard ! Not even enough regular 105 keys, you need more for all sorts of macros? The battleship - 122-button IBM or Unicomp will come to the rescue. Finally, if the classic layout does not suit, then there are numerous ortholinear and ergonomic keyboards of the most bizarre forms.
Brief history of 60% of keyboards
ADM 3A - grandfathers recruited
Take a closer look at the keyboard of the ADM-3A terminal :

Photo by Santo Nucifora. Source of
1975 No nampads or individual arrows (note the HJKL key markings - this is moving the cursor to Vi). Escape is located to the left of Q, instead of the missing CapsLock, Control is located.
Hhkb
Happy Hacking Keyboard or HHKB - perhaps the most famous compact keyboard, the review of which was mentioned above at Geektimes. Details on all modifications are on the Deskthority Wiki .
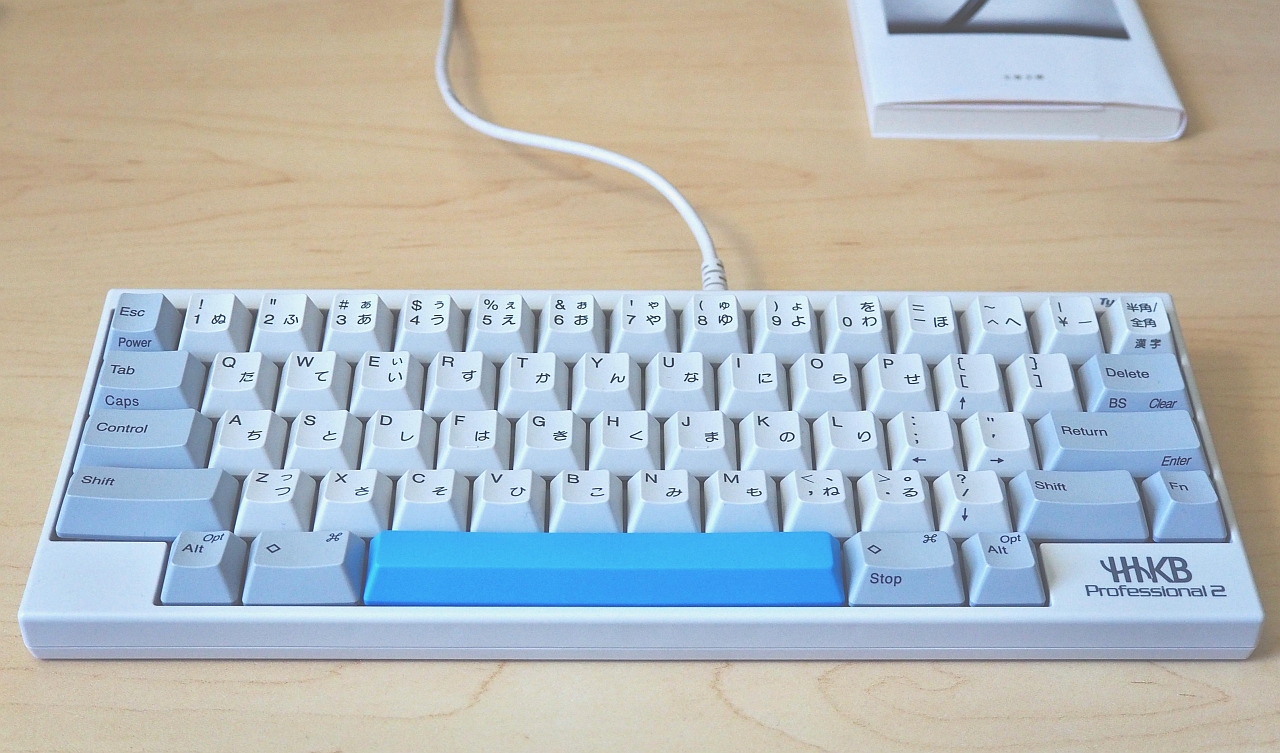
The author of the photo is cyht (Reddit username). Source of
Legend has it that HHKB was developed by some Japanese professor Eiichi Wada in the 1990s. The novelty was that, on the one hand, it was a return to the “golden age” of the ADM-3A and Sun Type 3 keyboards (Control instead of CapsLock, Delete in place of Backspace, Escape to the left of “1”), but in a compact lightweight case. and with a layer borrowed from Fn laptops.
HHKB was originally just a membrane. In 2003, the line was divided into HHKB Professional with capacitive Topre switches and membrane HHKB Lite. HHKB Professional and HHKB Professional 2 (second generation) have long been quite expensive - more than $ 300 (Japan and cult status), but the emergence of strong competitors in the 2010s did its job, and the price dropped to $ 250. But the price reduction is compensated by the cost of overcoming another drawback - the Fn layer is only one, and the ability to reassign keys is limited by switching Delete / Backspace and Meta / Alt using DIP switches. HUKB owners came to the aid of a keyboard guru, a prophet and a superhero Hasu - developed an alternative controller running TMK firmware : reassigning any keys, several layers, mouse cursor control and other functionality. On the controller, you can save a little by manually screwing the Teensy to the insides of the HHKB.
Poker
A small lyrical digression - a brief description of the market for mechanical keyboards over the past 20 years. In the late 1990s, the mechanical keyboard market shrank to its limits. Personal computers have become really massive, have fallen in price greatly, and the mechanical keyboards for $ 100-300 have lost the ten-dollar membrane. The production of IBM / Lexmark Model M was minimized, more precisely passed to Unicomp, but it was greatly reduced. Numerous switches of Japanese and Taiwanese manufacturers disappeared before, even the Alps production, which was used in the famous Apple Extended Keyboad keyboards, turned off (later these switches will be revived under the Matias brand), even Cherry itself has a large line of membrane keyboards.
In the 2000s, the situation began to change. Cheaper prices have reached the limit, the market has become saturated with cheap keyboards and a layer of users has begun to grow, who have begun to pay attention not only to the processor clock frequency, video card performance and monitor diagonal, but also to input devices. In 2001, Topre, which had long been engaged in the production of keyboards with capacitive switches for professional use (special keyboards for the banking sector, television studios, etc.), drew attention to ordinary users and created the Realforce brand. In 2006, the second generation Das Keyboard appeared, the classic Cherry G80-3000 in a black case under a different name, and two years later - the third, of its own design.
The patent for the Cherry MX switches in the early 2010s has not expired (correct, if I made a mistake), as Chinese clones have already started to appear: Gateron, Outemu, Kailh, Greetech. The market demanded more and more inexpensive mechanical keypads, including gaming ones, with a futuristic fussy design and 500 backlight modes. Appeared quite decent quality Chinese keyboard for $ 40-60 instead of the famous Das Keyboard, Topre, Filco, Cherry and Leopold.
Let's move from the general history of mechanical keyboards to 60 percent. In 2011, HHKB had a serious competitor - the Vortex Poker keyboard.
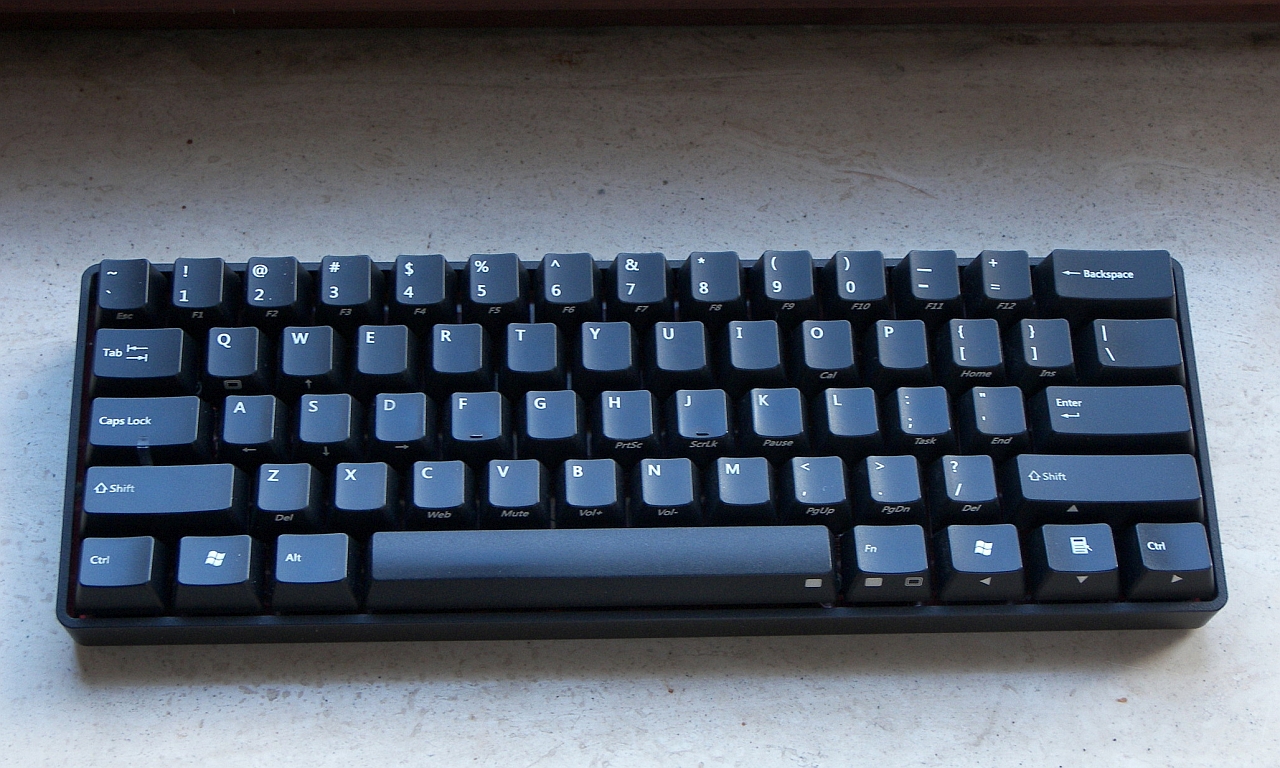
Photo by Jbert. Source of
The limited keyboard area is used more rationally in comparison with HHKB. Secondly, the layout was familiar - the main part of the standard 104/105-button ANSI and ISO layouts with Escape instead of tilde was taken as the basis. The first version of Poker was not programmable (some settings like replacing CapsLock and Control were available via DIP switches, like on HHKB), in the second version a programmable layer Pn was added to the regular Fn layer. Finally, in 2014, Poker 3 appeared, or Pok3r . Increased competition has led to the need to further improve the keyboard while maintaining the price: aluminum case, three programmable layers, layouts Dvorak and Colemak.
Already in the first generation, Poker has become the benchmark of the 60% keyboard. In the description of many ready-made keyboards that appeared later, or self-made projects, the standard Poker layout is mentioned, and everyone immediately understands what is being said.
Flourishing
Over the past couple of years, competition has only intensified. Switches Gateron, judging by the reviews of Reddit regulars, overtook the quality of Cherry MX. The remaining MX-compatible switches also became noticeably better, and they already had their own unnamed clones. There is even a Chinese alternative to Topre in the form of Plum keyboards.
A few more factors - the emergence of low-cost microcontrollers, 3D printers, a large number of services for the manufacture of printed circuit boards, laser cutting of metal and acrylic. All this is due to the growing interest in DIY-projects in the field of electronics. Enthusiasts felt the need for 60% keyboard and before the advent of Poker, when almost the only keyboard of this class was expensive HHKB, which, as I mentioned, besides the affordable price did not have enough settings flexibility. Began a rapid growth of keyboard DIY projects. The TMK project appeared, the terminal variants of the Model M keypads were “released”, the maniacs, one after the other, literally began to saw off all extras from the keyboards to a state of 60%. How do you like the Happy Buckling Keyboard project - breaking IBM Model M?
An important milestone in keyboard design is the GH60 project - a printed circuit board designed by one of the enthusiasts to create a Poker-like keyboard. The hardworking Chinese became interested in the growth of interest in the keyboard-building hobby and began vying with the first to offer Poker / GH60-compatible plastic, wood and aluminum cases, beautiful cables, wrist supports, and then completely cloned the GH60 board - GH60 Satan supports LEDs for all keys and possible quality problems (see below).

Of course, not to mention Anne Pro - the popular Poker'like keyboard. Bluetooth, RGB backlighting, PBT keys, macros, Gateron switches, several multi-colored cases to choose from - for $ 70-80. As a former owner (sold, since I could not get used to Gateron Brown, which is too easy for me), I can say that this is the best alternative to Poker if you don’t want to get involved with self-assembled keyboards. Unfortunately, some bugs have not yet been fixed in Anne Pro (setting macros, controlling the backlight when reassigning Fn to another key, etc.).
Poker layout can be improved. Last year, the small-scale project Banana Split appeared .

The author of the photo is Arhipio. Source of
The author asked the question - do we really need one long space and long shifty? As a result, a board and mounting plate were developed to experiment with the layout. You can make a so-called "divided" space - instead of one 6.25 U, you can get two smaller ones by squeezing another key in the middle. The shifts and the number of lower modifiers on the right can also be pressed, for the sake of the selected arrows, for example.
Choosing a kit for assembly
My first 60% keyboard I liked so much that I began to think about the need to have the same at work. It did not want to buy the second Anne Pro, because you need to try something new. Requirements were as follows:
- Classic 60% Layout, similar to Poker and Anne Pro. Why do I need to develop two sets of keyboard reflexes? The second argument is that it is easier to find an inexpensive set of keys for the standard layout.
- More programmability. One programmable layer and some other restrictions of Anne Pro did not bother me yet, but it was still worth considering keyboards with free TMK or QMK firmware.
- RGB-lights, as well as lights in general, I were not needed. For the sake of color special effects, I'd rather turn on a Christmas tree, and the garland built into the keyboard only distracts. Moreover, in the office I work with the lights on.
- I wanted some unusual case. Wooden or aluminum, only with color anodizing, green or purple.
- The price should not be ruinous. That is, all sorts of unique projects for $ 300 with brass plates did not suit me. The keyboard should be unique, but within the limits of what the Chinese can.
After reading a bit of Reddit, I chose the GH60 Satan, the Chinese clone of the GH60 mentioned above. At this stage, I still knew little of the hardware, so it was desirable to find a kit consisting of at least a board, a plate, and stabilizers.
In the MechanicalKeyboards community on Reddit, everyone recommended one seller on Aliexpress. The cost was as follows:
- GH60 Satan Kit (board, aluminum plate, aluminum case, stabilizers, LEDs, Gateron Blue switches, two-meter USB cable) - $ 113.31
- Keys (PBT with Cherry profile, laser engraving, cheap DSA Granite kit clone) - $ 20
Total : $ 133.31. Here it is also worth adding 150 rubles for a sheet of noise-insulating material (about it below). How can I save? For example, it was possible to take PBT-keys without labels from the same seller for $ 10. But the keys were already purchased by this point - I planned to put them on Anne Pro, but changed my mind, so they came in handy. First of all, you can refuse the aluminum case and get away with plastic - $ 87.40 with delivery (+ $ 10 per key).
There are many alternative options. For example, TADA68 in the form of a set with a plastic case for $ 94 or $ 160 with aluminum; The XD60 / XD64 kit (very similar to the TADA68) is about $ 97. Do you want plastic? On Aliexpress is full of wooden cases. There is not quite a body - a steel plate on which switches are mounted, with a U-shaped bend. But it was with the aluminum case that $ 123 is cheaper (if you take it with the ten dollar PBT keys without inscriptions) I didn’t find anything. Pok3r (Poker 3) looked tempting (metal case, well-known brand), but was more expensive ($ 135 + shipping), and most importantly, after Anne Pro, I was afraid that I would not have enough keyboard reprogramming capabilities.
Putting GH60 Satan
So, the choice was made, it remains to wait. The package came surprisingly quickly, in just two weeks.

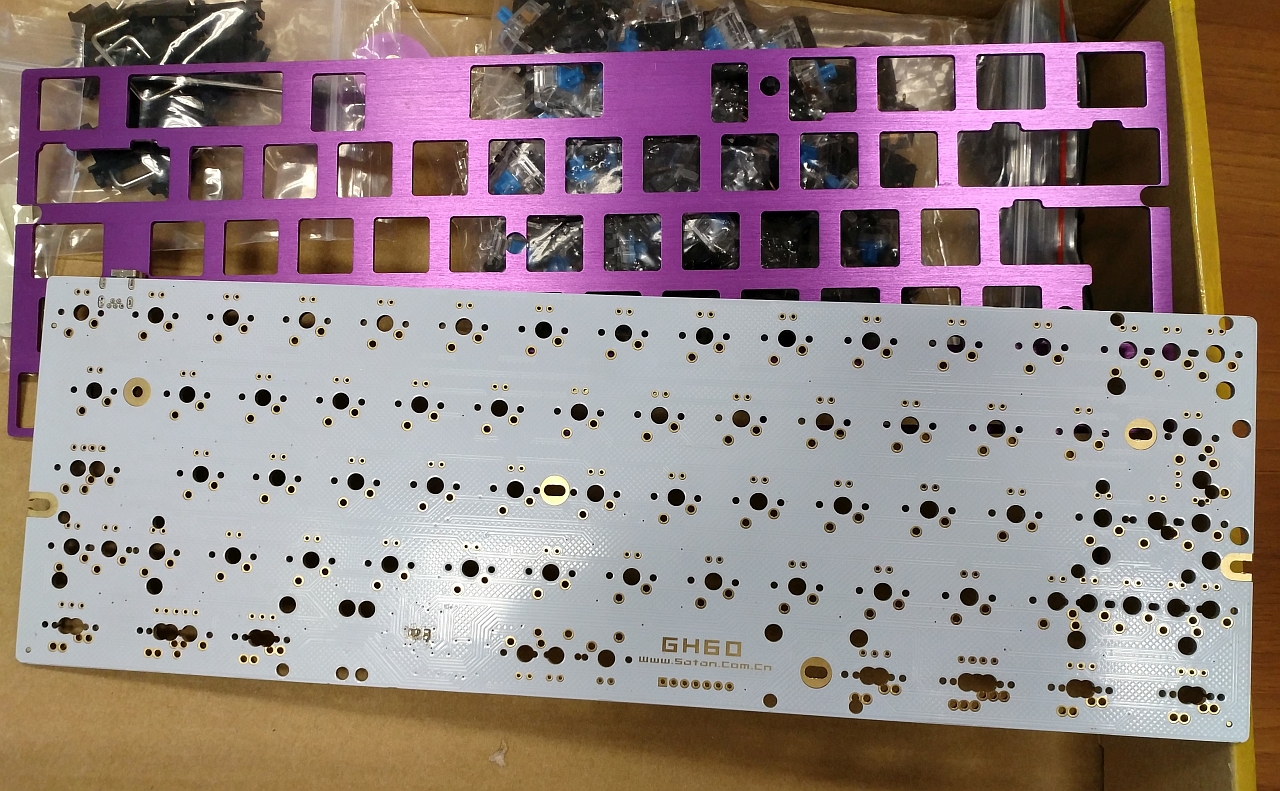
Everything was well packaged, the plate and the board were packed together, “sandwich”, for reliability - in almost all reviews from people who ordered the plate separately, it came noticeably bent. I do not know why I chose purple. It seems to have never experienced a special predilection for him. Most likely, simply because black, silver and red is too trite. The quality of the case is five plus. The walls are thick, no anodizing defects or tool marks. Unfortunately, not without a spoon of tar. First, on the board were visible traces of handicraft repair or refinement in the form of two somehow soldered capacitors:
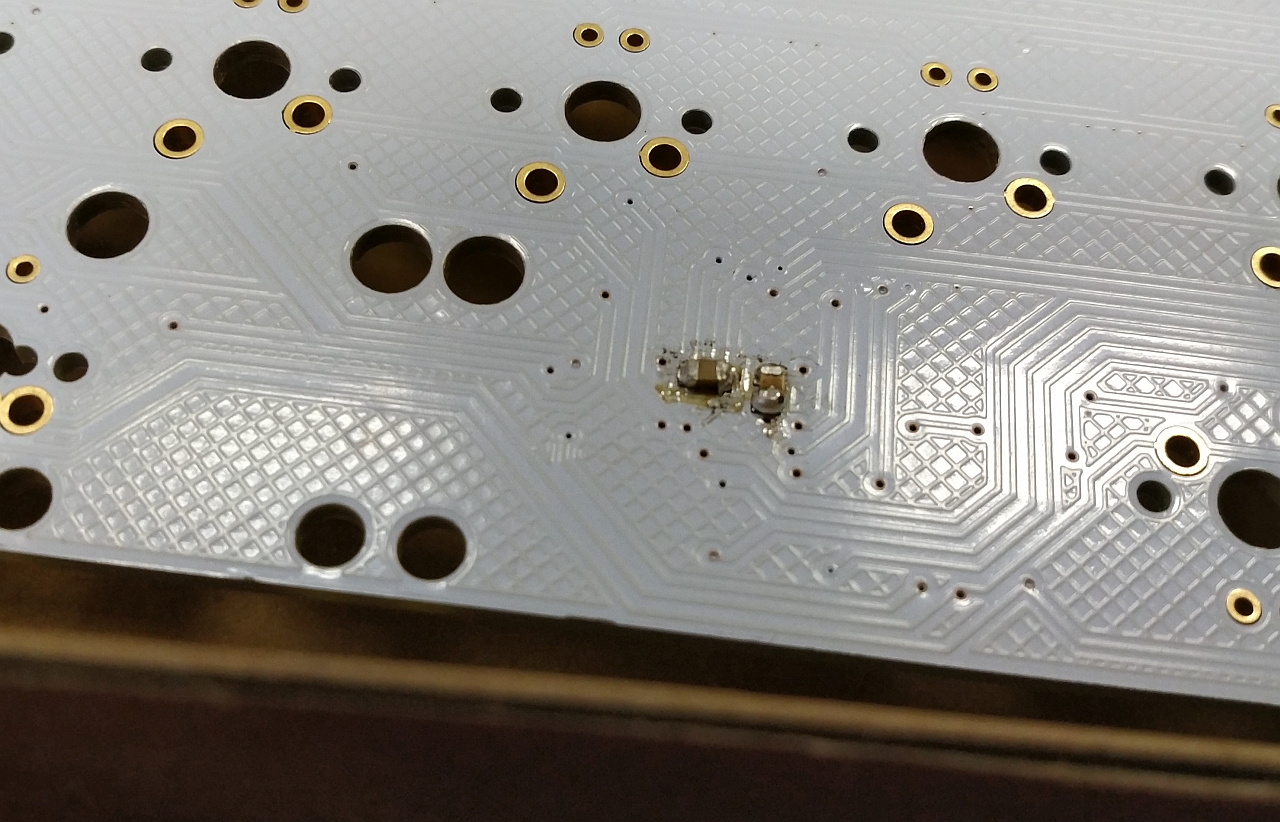
Secondly, it was not exactly what I ordered - a polished plate instead of polished and blue LEDs instead of violet. I did not make any claims to the seller. I checked the board and warned about the capacitors, of course. The texture of the plate and the color of the LEDs are not so important to me personally - the plate is almost invisible under the keys (but the color coincides with the body, which is good), and I do not use the backlight in the office, but when I turn on, I am completely satisfied with the blue color.
Plate and general view of the board from the front.
All components except the switches are soldered on the board: the Atmega32U4 microcontroller, the diodes for the keyboard matrix, the resistors in the LED circuits, and so on. All that remains is to insert the switches into the holes of the mounting plate, then carefully push all the contacts of the switches into the corresponding holes on the board, solder the switches, then the LEDs. But do not hurry. First check the board. The basic firmware is already there, and you should make sure that the board is working by running some keyboard test (for example, this one ) and closing the contact pads for the switches with tweezers. It will be more difficult to make claims to the seller after you started to solder the board.
Next, take on the stabilizers.

These are the very things that do not allow wide keys (more than 2 U wide) to warp when pressed. The designs of stabilizers in the entire history of keyboard development have been invented by a great many, but in this case we have a choice between two types of wire stabilizers differing in their mounting method — Cherry (mounted in holes on the board) and Costar (mounted in rectangular holes in the plate). The principle of operation of simple Cherry stabilizers is simple - two supports with sliders are interconnected with a wire clip that “synchronizes” their vertical movement. The upper part of the sliders is equipped with a standard cross-shaped mount Cherry-MX - wide keys have corresponding mounting on the sides. In the assembled set with the classic Poker layout, stabilizers are installed under the Backspace (2 U), Enter and Left Shift (2.25 U), Right Shift (2.75 U) and Space (6.25 U) keys.
Remember that the board and the plate are universal, there are several options for holes for switches and stabilizers on the board. You should not start the full assembly of the keyboard (wiring switches), without having a full set of keys . We put brackets into stabilizers, lubricate with silicone grease, insert stabilizers into the mounting holes of the board, insert the holes in the plate with the switches in place of the modifier keys, put the keys on the switches and try to combine them without exerting excessive force so as not to bend the contacts. The revision I forgot about is that at the point of contact between the board and the stabilizer bracket, it is worth sticking strips of plaster on a fabric base to muffle the sound of the strike of the bracket on the board surface. Perhaps I will do this later, using a pair of tweezers somehow.
Add the rest of the switches, set the keys again at key points (on all modifiers and the keys adjacent to them), turn them over and carefully put the board on top.

Carefully inspect the board for jammed switch contacts.

Next we have a long process of soldering switches and then LEDs.The shells of most modern Cherry MX switches and clones have through holes for LED pins. After soldering, bite off the leads and wash off the flux residues. Here at this stage, I waited trouble. I have little experience in soldering, since the days of the amateur radio a lot of water has flowed underneath, so the soldering was not very neat, I used rosin from the heart, and its excess was very hard to rub with a cotton swab with alcohol. Then I floated the toothbrush, periodically dipping it into isopropyl alcohol - after ten minutes the board turned snow white, but I did not take into account that I soldered the keyboard with mechanical switches - the rosin-alcohol solution leaked to the back side of the board through the additional mounting holes, leaked inside the switches and began to dry there.
Needless to say that some switches have lost a click or are completely tightly stuck? Catastrophe! Do not panic! It seems that the switches can be opened without soldering, for this there are special cuts on the plate. It remains only to make the "opener" of the clerical clip, then the whole cleaning will take no more than three hours. And what if ... wash everything together? I ran to the store for a plastic container, put the keyboard there and poured everything with a liter of isopropyl, after a couple of hours I changed it to a clean one. I look forward to it all dry. Hurray, I'm saved, everything works.
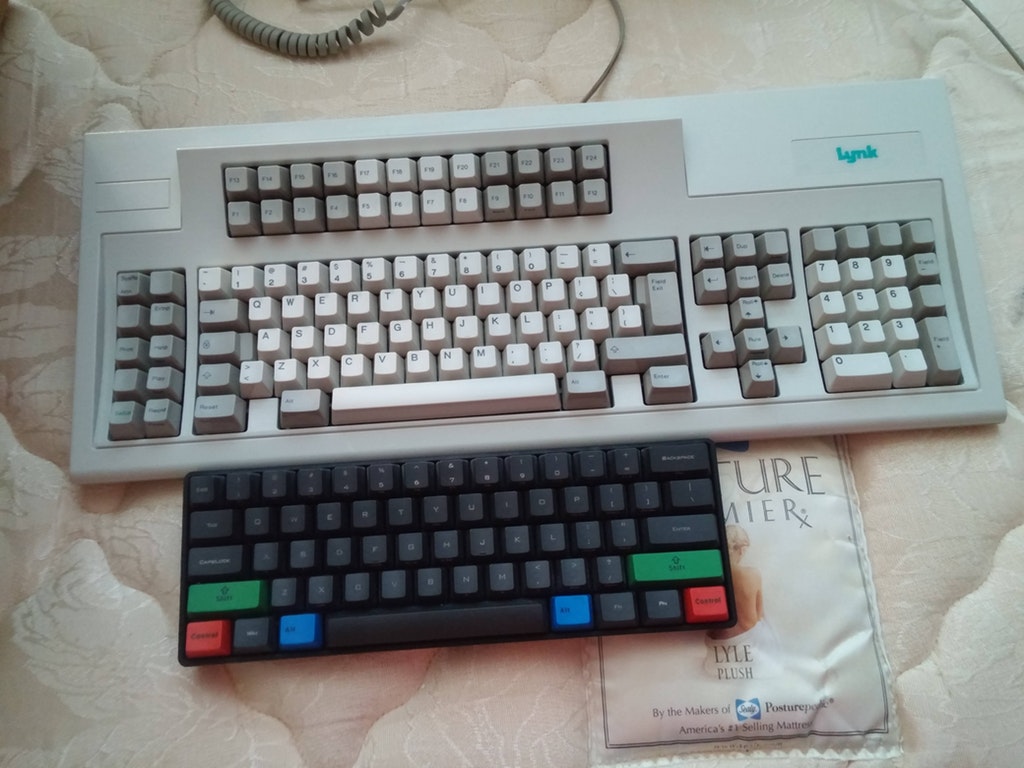
Install the keys. In the background - Unicomp Customizer 2010, modern reincarnation of the IBM Model M.
If you have not noticed right away - pay attention to Enter. It is turned slightly counterclockwise. It was necessary not only to install the modifier keys before soldering, but also temporarily put in pieces of cardboard for fixation between them - the plate is universal and has a large cutout for installing both ANSI and ISO (L-shaped) Enter'ov, so the switch in the corresponding hole is not clearly fixed. It will be necessary to solder the switch.
When working on a new keyboard, I almost immediately turned my attention to the ringing, annoying high-frequency ringing during fast typing. This resonance from the body was able to drown out with the help of soundproof material.

A large sheet was purchased for 150 rubles in the auto parts store. Reminds glue "liquid nails" in a semi-dried condition on a fabric basis. The keyboard was not so easy, and after sticking noise insulation in weight it resembles a brick.
On standard firmware you will not get far. There are several ways to customize the layouts and firmware of this set. I'll tell you more about the most convenient for me. On a working PC, I use Windows, I don’t have advanced QMK features ( tap dance , for example), so I decided to start with TMK and a simple GUI generator of firmware:
- Install Zadig drivers .
- TKG toolkit , setup.bat. GH60 RevCHN , atmel_dfu. common\firmware gh60-revchn.hex. -, Keyboard layout editor . , Easy AVR.
- Easy AVR USB Keyboard Firmware and Keymapper — GUI- , . Atmel Flip, . , Easy AVR TKG toolkit reflash.bat. , . — . Waiting for bootloader… , .
The final part is the configuration. As you know, the taste and color of all the markers are different. Someone is more comfortable arrows on WASD (left), I prefer the right (IJKL) or in the style of Vim - on HJKL. I still have not found the use of macros. It is not safe to enter passwords with them, and for Unicode characters it is easier and more versatile to use Compose (WinCompose exists under Windows).
So, the first layer, the standard mode of operation. First, select New layout, keyboard type GH60 Satan and Poker layout:

We get the standard ANSI-keyboard layout Poker, which can and should be slightly modified.

In the first layer, I placed another Fn instead of the CapsLock that I do not need, and instead of Escape I assigned a tilde, since the letter “e” is more necessary to me than Escape. Users Vim here, of course, do not agree.
Layer Fn1 (copy from previous - copy layer, paste layer):
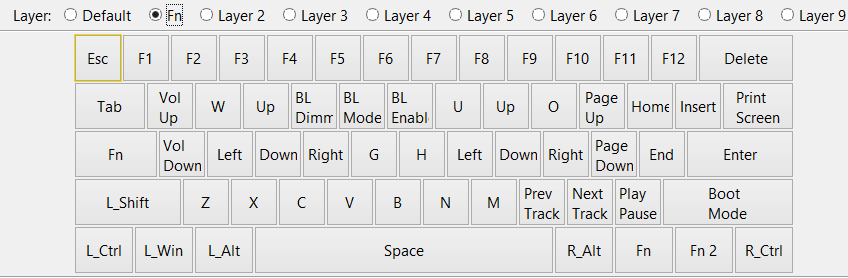
First, we need arrows. I made two sets - on the left of ESDF (I have been preferring ESDF for twenty years instead of WASD in shooters because of the protrusion on the F button) and on the right of IJKL. As a result, 99% I use the left Fn (formerly CapsLock) and the arrows on the right. Then there are other necessary buttons: Delete (its location under Backspace seems intuitive to me), PageUp, PageDown, Home, End, a series of F-keys in place of numbers and Escape. BL enable / mode / dimmer - enable, mode, backlight brightness. The important button is Boot mode. Allows you to go to the bootloader for flashing without having to turn the keyboard over to press this flimsy hardware button, which I have already managed to fall apart. Only now I realized that I forgot to add Scroll lock, I use it extremely rarely, but I need it.
Second layer, Fn2:

Present on many ready-made 60% keyboards layout with highlighted arrows. On the first two layers, the Fn2 button is set to toggle mode instead of normal, i.e., instead of switching to a layer while the button is pressed, it switches to a layer when pressed once. After switching to this layer, the Fn2 button is no longer in its original place - now the right arrow is instead of it. To disable the Fn2 layer and return to the default layer, such a button is still needed - I put it instead of the left Fn (which is in the CapsLock place), also in toggle mode. For more convenience, it was possible to assign it to the place of the right Control. Now I press Fn2 and I can flip through texts or photos with highlighted arrows without having to hold both hands on the keyboard. I click CapsLock (to which Fn2 is assigned in this layer,while on the key I have the vintage inscription HYPER - confused, right?), and the keyboard returns to normal mode.
There is still some free space on the first two layers, and there are seven more layers. You can add mouse controls — three mouse buttons and cursor movement, but it's still faster and more convenient for me to reach for the mouse. This is about adding a layer with a pad as you would think in notebook keyboards.
After a month, I can say that I am almost completely satisfied with this keyboard. Improvement in ergonomics has been achieved, noise has decreased in comparison with Unicomp, but I’m not only used to the arrows on IJKL, but already suffer from the inability to assign them there on ordinary keyboards. Can I do without a nampad? If you often need to type a large number of numbers (for example, drive something into Excel with your hands), then a pad is definitely needed, but nobody deprives you of it - there are separate caps for every taste and color, including mechanical switches. 60% or TKL keyboards make it possible to retain their main advantage in reducing the distance between the mouse and the main working area of the keyboard - the pad can be placed to the left of the keyboard or to the right of the mouse. Moreover, open firmware gives us the freedomnampad can be used part-time as a macro drop to speed up work in some Photoshop or other software with an abundance of keyboard shortcuts.
Stabilizers could play smaller, the USB Type C would be more durable from a mechanical point of view (but on the other hand, I do not disconnect / connect the keyboard every day); , add a beautiful purple twisted cable, but for $ 130 the keyboard suits me and in this form.
Of course, as with any hobby that turns into a lasting dependency, it’s extremely difficult to stop at one thing, because there are ergonomic keyboards, a fairly detailed overview of the species diversity of which was described at Geektimes three and a half years ago . To build ErgoDox , ergonomic separate keyboard, already have almost everything you need.
useful links
- Community MechanicalKeyboards on Reddit . Over 200,000 followers. Caution!Contains lethal doses of keyboard porn .
- Deskthority is a keyboard forum with a great wiki.
- Geekhack is another keyboard forum.
All Articles