Modernization "plates" under the lamp GX70
After a series of publications (in my profile) for choosing a maize NLL, I took a pause to monitor the actual operation of these lamps. The conclusions were expectedly disappointing - almost every month I was forced to spin the lamp and change the next “corn”. What is characteristic, they did not even burn out - they began to blink. I emphasize that in those lamps that were turned on for a short time, the NLLs work normally. Personally, it is obvious to me that problems arise because of poor components and a suboptimal temperature regime of operation due to an unsuccessful design.
Considering that I didn’t choose the cheap NLLs, but tried to find the best manufacturers in the famous Chinese online store and they cost up to 400 rubles - it was concluded that this approach does not justify itself from a practical point of view.
The second premise for change is the desire to do something with your own hands, in accordance with your own current notion of which SDLs and in what way should be used in lamps.
At the current level of development of consumer LED lighting, it is obvious that the LEDs should not be located compactly in a closed bulb. And you need to take measures to organize an effective heat sink.
Mentioned online stores have many items or upgrade kits.
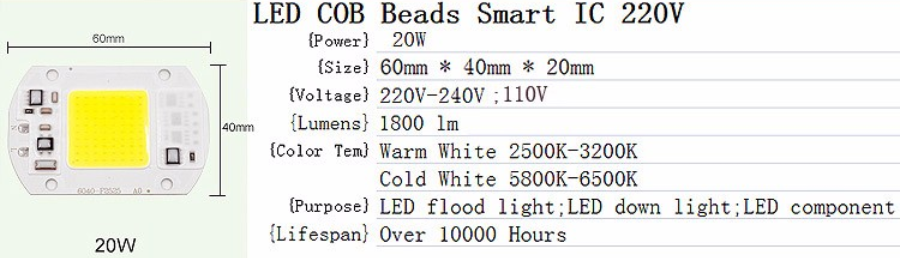
The first option is the Chip on the Board elements. They are very different, in this context it is important to divide into elements without a driver and with an already built-in driver.
Sample element without driver:

The option is good because you can a) type an arbitrary number of elements (for the planned total luminous flux) and b) you can construct your own driver. Obviously, this is an option for advanced users who are well versed in electrical engineering.
An example of an item with a driver:
This option is suitable for fans of my level, because you just need to connect the board to the network.
Separately, there are standard sets for reconstruction:

The number of LEDs on the "rays" may vary under the desired level of illumination. In this case, no fuss at all is required (except for the "demolition" of the previous reinforcement).
What I see are the fundamental flaws of this approach:
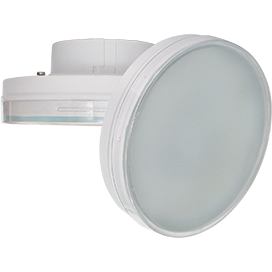
On the other hand, I have long liked the GX53 lamp, one of them has been burning in the kitchen for several years as a light above the sink. A well-known Russian company produces them with a guarantee of 3 years, and independent tests (online, and my own) confirm the stated characteristics (especially in terms of color rendering index, no flicker, light flux). The main thing that I like about them is the planar enough free arrangement of the CD and the availability of space to accommodate a quality driver.
Then I remembered that there is a GX70 base and under it in our market there are 2-3 manufacturers (including those mentioned with a 3 year warranty). It is important that there are lamps of decent power, up to 23 watts. For subjective reasons (some distrust of this manufacturer), I bought only 2 GX70 LED Premium 20W 220V lamps (1600 lm, 4200 K, 30,000 hours).
There is some problem that a more well-known and high-quality manufacturer produces such lamps with a capacity of only up to 12 watts. At the same time, they cost 2 times more expensive than the indicated 20 W lamp. So it was a kind of compromise.
Separately about the actual basement. Initially, I thought to buy patch fittings for such lamps. Fortunately, I came across a cap of this type in time:

Fortunately, because the place under the canopy “plates” is still strictly limited, the invoice option would hardly have passed. The basement costs about 60 rubles. However, the quality leaves much to be desired. I went through them all, trying to provide a more reliable contact and a clear fixation of the lamp.
Initially, I did not want to put the base directly on the base of the plate, I wanted to leave a gap under it for ventilation, first. And to direct the flows from the lamps in different directions at a small angle, and secondly. To do this, from the remnants of the metal roofing sheet were made parts of this form:
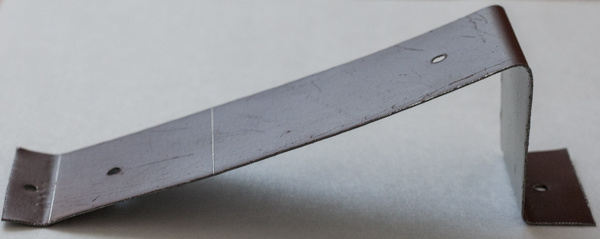
It contains 2 holes of 3 mm for fastening the base and 2 of the same holes for fastening to the base of the lamp. The height of the vertical part is 40 mm. Now I would do 20-30, yet the GX70 lamp on the base "eats" a lot of height. Fortunately, in my case there was enough space.
Again, initially I wanted to make the lamp ventilated. Pretty quickly, I found a suitable model:

It is good because it is compact (92 mm), designed for mains supply and produces only 16 dB of noise at 1,400 rpm.
Here is a photo of the original lamp without the ceiling plate:
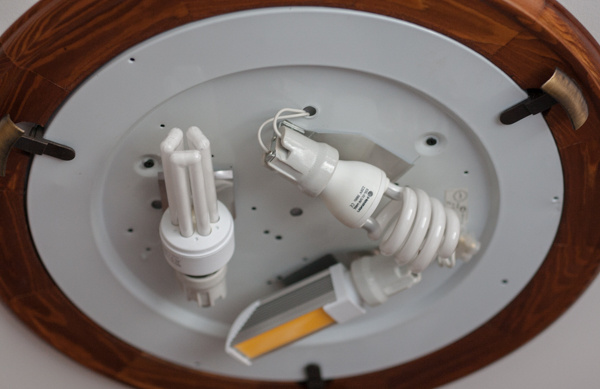
You can see what kind of "zoo" lamps were there. This is due to the fact that I need the maximum luminous flux from this lamp, but I turn it on only a few times a month (that is, very rarely). This lamp was chosen not because it was urgently needed to be modernized - but as an experimental guinea pig. Immediately I didn’t want to throw at the similar plate in the big room.
The base is intelligently designed, so the fittings are removed quickly and easily:
After that I began to think how many lamps to put. My initial plan involved 6 pieces (imagine 1600x6 = 9600 lm !!). But I overestimated the amount of available space, I had to "cut down the sturgeon" to 4 lamps.
Mark and drill holes (3 and 4 mm). First, I installed a fan on the M4x50 screws, then I attached a cap to the bases on the M3x18 screws. And then the base assembly assembled screws M3x9.
It turned out like this:
I am not very friendly with electrical engineering, so I chose the simplest option: I assembled the corresponding wires in 2 beams (on soldering) and attached to the block.

Naturally, I removed the wires under the base to reduce the temperature load. Unfortunately, the design of this lamp does not allow to remove the block there.
To paint, with what tricks I had to hang the base back, I will not, using foul language here is indecent. Mount this lamp is made, of course, ill-conceived.
Here is the lamp assembly on the ceiling:

You can see that I removed the glass diffusers from the lamps (they are fixed on the sealant and are additionally fixed on the top with a transparent hoop). The point is obvious - to improve the heat sink.
Turning on the lamp with two lamps showed the presence of a high-pitched squeak. It is heard only in complete silence. In this case, which is characteristic, the sound level meter does not see the difference:

Green arrows - this is dark, red - when the lamp was burning. Accordingly, the peaks - on and off. It can be seen that the average noise level is 25 dB (the system unit worked in the room), that is, the construction does not formally introduce additional noise. But the squeak, of course, is annoying.
I turned on the fan separately, it barely audible (16 DV!) Rustles. Those. This is a squeak from the driver (s) of the lamp. And if in this luminaire this squeak does not bother me at all, then in situations where the light is constantly on in a quiet room, you obviously need to think about lamps from another manufacturer.
But light, these 2 lamps just give the sea:
To make it clear how much of it there is, I will say that I took it off today, on a bright sunny day. And I had to “pull out” the shadows.
I will give comparative data. In the kitchen I have a lamp with 8 60-watt lamps. Below it, the illumination is about 370 lux (the sensor is about 1 meter from the floor). Under these two lamps (standing in the middle below them) there is illumination of 260 lux.
[Added a day later] I bought 3 lamps with a power of 12 W of a famous manufacturer with the letter “G”, but no miracle happened. Squeak is present in all lamps. Illumination at a height of 1 meter from the floor 450 lux, evenly across the floor. So I am very pleased with the light. With a squeak, if necessary, I will fight the transition to the GX53, it definitely does not squeak.
The presence of bright spots on the ceiling a bit unusual. But if you do not look up and look down, then the lighting is uniform. Ceiling diffuser performs its function.
It is much more pleasant that the temperature of these light spots to the touch is not more than 50 degrees. Those. fan eliminates local overheating. Naturally, from the gap between the canopy and the base there is a light current of slightly warm air.
Summarizing, I consider this project successful in the sense of testing the initial hypotheses and the result obtained. The best part is that nothing had to be redone and immediately earned.
Of the main advantages:
In the following projects I would think more carefully about the following points:
In conclusion, I would like to thank VS. Makarov for valuable advice and making the bases of socles. He is an extremely qualified radio amateur (I'm not sure that this is the exact word, but I can’t find another one), here’s a link to one of his work (not the most serious, but very cool).
Considering that I didn’t choose the cheap NLLs, but tried to find the best manufacturers in the famous Chinese online store and they cost up to 400 rubles - it was concluded that this approach does not justify itself from a practical point of view.
The second premise for change is the desire to do something with your own hands, in accordance with your own current notion of which SDLs and in what way should be used in lamps.
Choosing an upgrade option
At the current level of development of consumer LED lighting, it is obvious that the LEDs should not be located compactly in a closed bulb. And you need to take measures to organize an effective heat sink.
Mentioned online stores have many items or upgrade kits.
The first option is the Chip on the Board elements. They are very different, in this context it is important to divide into elements without a driver and with an already built-in driver.
Sample element without driver:
The option is good because you can a) type an arbitrary number of elements (for the planned total luminous flux) and b) you can construct your own driver. Obviously, this is an option for advanced users who are well versed in electrical engineering.
An example of an item with a driver:
This option is suitable for fans of my level, because you just need to connect the board to the network.
Separately, there are standard sets for reconstruction:
The number of LEDs on the "rays" may vary under the desired level of illumination. In this case, no fuss at all is required (except for the "demolition" of the previous reinforcement).
What I see are the fundamental flaws of this approach:
- the use of SMD chips and, moreover, COB is associated with the risk of “running into” low-quality products (color rendering index, luminous flux, service life, etc.)
- maintainability of these products is limited and / or requires high qualifications.
On the other hand, I have long liked the GX53 lamp, one of them has been burning in the kitchen for several years as a light above the sink. A well-known Russian company produces them with a guarantee of 3 years, and independent tests (online, and my own) confirm the stated characteristics (especially in terms of color rendering index, no flicker, light flux). The main thing that I like about them is the planar enough free arrangement of the CD and the availability of space to accommodate a quality driver.
Then I remembered that there is a GX70 base and under it in our market there are 2-3 manufacturers (including those mentioned with a 3 year warranty). It is important that there are lamps of decent power, up to 23 watts. For subjective reasons (some distrust of this manufacturer), I bought only 2 GX70 LED Premium 20W 220V lamps (1600 lm, 4200 K, 30,000 hours).
There is some problem that a more well-known and high-quality manufacturer produces such lamps with a capacity of only up to 12 watts. At the same time, they cost 2 times more expensive than the indicated 20 W lamp. So it was a kind of compromise.
Separately about the actual basement. Initially, I thought to buy patch fittings for such lamps. Fortunately, I came across a cap of this type in time:
Fortunately, because the place under the canopy “plates” is still strictly limited, the invoice option would hardly have passed. The basement costs about 60 rubles. However, the quality leaves much to be desired. I went through them all, trying to provide a more reliable contact and a clear fixation of the lamp.
Initially, I did not want to put the base directly on the base of the plate, I wanted to leave a gap under it for ventilation, first. And to direct the flows from the lamps in different directions at a small angle, and secondly. To do this, from the remnants of the metal roofing sheet were made parts of this form:
It contains 2 holes of 3 mm for fastening the base and 2 of the same holes for fastening to the base of the lamp. The height of the vertical part is 40 mm. Now I would do 20-30, yet the GX70 lamp on the base "eats" a lot of height. Fortunately, in my case there was enough space.
Again, initially I wanted to make the lamp ventilated. Pretty quickly, I found a suitable model:
It is good because it is compact (92 mm), designed for mains supply and produces only 16 dB of noise at 1,400 rpm.
Fitting installation
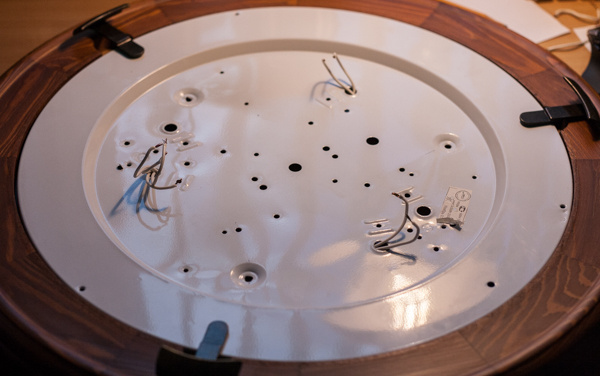
Here is a photo of the original lamp without the ceiling plate:
You can see what kind of "zoo" lamps were there. This is due to the fact that I need the maximum luminous flux from this lamp, but I turn it on only a few times a month (that is, very rarely). This lamp was chosen not because it was urgently needed to be modernized - but as an experimental guinea pig. Immediately I didn’t want to throw at the similar plate in the big room.
The base is intelligently designed, so the fittings are removed quickly and easily:
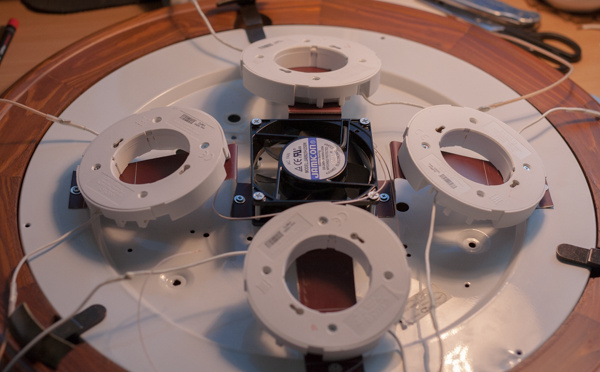
After that I began to think how many lamps to put. My initial plan involved 6 pieces (imagine 1600x6 = 9600 lm !!). But I overestimated the amount of available space, I had to "cut down the sturgeon" to 4 lamps.
Mark and drill holes (3 and 4 mm). First, I installed a fan on the M4x50 screws, then I attached a cap to the bases on the M3x18 screws. And then the base assembly assembled screws M3x9.
It turned out like this:
Electrics and Testing
I am not very friendly with electrical engineering, so I chose the simplest option: I assembled the corresponding wires in 2 beams (on soldering) and attached to the block.
Naturally, I removed the wires under the base to reduce the temperature load. Unfortunately, the design of this lamp does not allow to remove the block there.
To paint, with what tricks I had to hang the base back, I will not, using foul language here is indecent. Mount this lamp is made, of course, ill-conceived.
Here is the lamp assembly on the ceiling:
You can see that I removed the glass diffusers from the lamps (they are fixed on the sealant and are additionally fixed on the top with a transparent hoop). The point is obvious - to improve the heat sink.
Turning on the lamp with two lamps showed the presence of a high-pitched squeak. It is heard only in complete silence. In this case, which is characteristic, the sound level meter does not see the difference:
Green arrows - this is dark, red - when the lamp was burning. Accordingly, the peaks - on and off. It can be seen that the average noise level is 25 dB (the system unit worked in the room), that is, the construction does not formally introduce additional noise. But the squeak, of course, is annoying.
I turned on the fan separately, it barely audible (16 DV!) Rustles. Those. This is a squeak from the driver (s) of the lamp. And if in this luminaire this squeak does not bother me at all, then in situations where the light is constantly on in a quiet room, you obviously need to think about lamps from another manufacturer.
But light, these 2 lamps just give the sea:
To make it clear how much of it there is, I will say that I took it off today, on a bright sunny day. And I had to “pull out” the shadows.
I will give comparative data. In the kitchen I have a lamp with 8 60-watt lamps. Below it, the illumination is about 370 lux (the sensor is about 1 meter from the floor). Under these two lamps (standing in the middle below them) there is illumination of 260 lux.
[Added a day later] I bought 3 lamps with a power of 12 W of a famous manufacturer with the letter “G”, but no miracle happened. Squeak is present in all lamps. Illumination at a height of 1 meter from the floor 450 lux, evenly across the floor. So I am very pleased with the light. With a squeak, if necessary, I will fight the transition to the GX53, it definitely does not squeak.
The presence of bright spots on the ceiling a bit unusual. But if you do not look up and look down, then the lighting is uniform. Ceiling diffuser performs its function.
It is much more pleasant that the temperature of these light spots to the touch is not more than 50 degrees. Those. fan eliminates local overheating. Naturally, from the gap between the canopy and the base there is a light current of slightly warm air.
Conclusion
Summarizing, I consider this project successful in the sense of testing the initial hypotheses and the result obtained. The best part is that nothing had to be redone and immediately earned.
Of the main advantages:
- use of easily accessible components
- exceptional ease of maintenance / repair
- possibility to choose high-quality lamps
- organization of forced air circulation.
In the following projects I would think more carefully about the following points:
- using the GX53 base, it will allow to place them in a larger number and more compactly (closer to the center, so as to guarantee not to touch the ceiling); it is important to remember that the range of lamps with this base is wider than with the GX70;
- the angle of divergence of the light fluxes can be made slightly smaller (the profile of the base for the base can be made with a smaller height);
- if it is not possible to cut parts from a metal sheet, the bases can be placed on long screws (so that there is a gap for the air stroke under them).
In conclusion, I would like to thank VS. Makarov for valuable advice and making the bases of socles. He is an extremely qualified radio amateur (I'm not sure that this is the exact word, but I can’t find another one), here’s a link to one of his work (not the most serious, but very cool).
All Articles