We solve the problem of PC noise with a home-made device, and at the same time we learn from scratch to make beautiful cases for DIY projects
Hi, Giktayms!
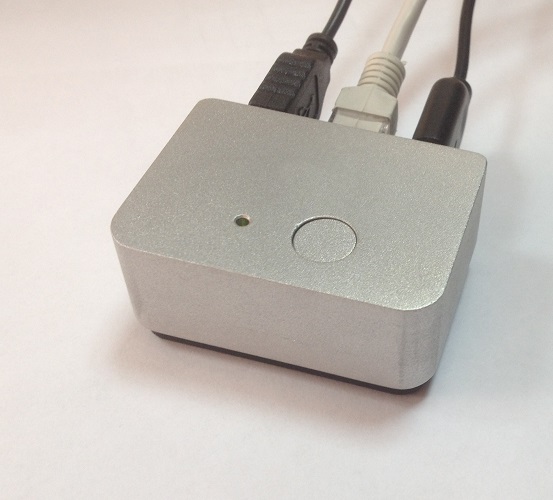
Assemble absolutely silent PC - you can. You can and buy. But what to do if you need a professional or powerful gaming video card with active cooling? Or maybe you do not have a Windows / Linux media player, but there is an extra old noisy PC and a room where it can be removed? Or just want minimalism on the desktop and around it?
So, many articles and comments were devoted to moving the computer away from the workplace - this is another one. In her
a) the process of creating a device that helps move the power button of the PC, the power indicator and two independent USB to a distance of up to 10 meters using a standard Ethernet cable will be described;
b) general recommendations will be given for designing DIY hull parts made of metal by laser cutting and bending, milling, turning.
Severe professionals will find a lot of flaws and flaws here, but ... We'll leave the ESKD drawings and teardrops at the contact pads for more intelligent and capacious products.
Formation of TK
- The device must be independent of the OS and software. So that when updating any software something does not break. It should solve the problem, not create a new one.
- Should not give delays in the transmission of video (lags). To be able to play games.
These two points hint to us that there should be no active components.
- Must have two separate USB for keyboard and mouse, PC operation indicator, power button.
- Must be installed as simple as possible.
And these two points simply push us to use a standard Ethernet cable.
- To have a normal appearance, so as not to be ashamed to put on the desktop. That is, the numerous plastic cases of Chinese handicrafts do not fit.
Device ideology
The video signal is easier to transmit through a factory-made special cable. I considered unnecessary adapters between the video card and the monitor unnecessary - so standard 10-meter HDMI is used.
For keyboard and mouse, high-speed USB 3.0 (and even 2.0) is not needed. That is, nutrition can be combined.
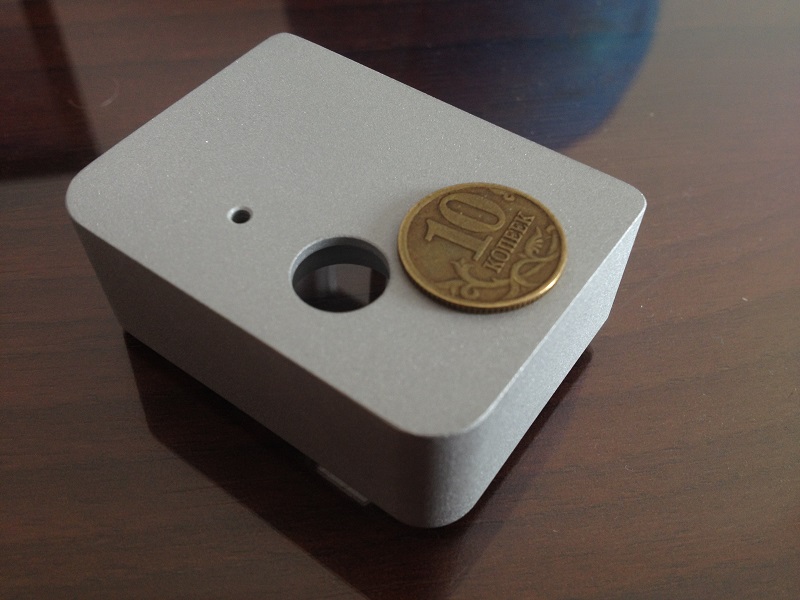
The power button of the PC is just a button, any normally open without latching.
The power indicator is a separate LED connected to individual motherboard pins. Fine. But
Thus, for the implementation of the planned need only 8 wires. Surprisingly, it is exactly how many wires contain a standard Ethernet cable, which can be bought in any store already compressed to the desired length. We draw the scheme so that direct or reverse crimp does not affect the performance of the entire device. UPD: Attention - it is possible that in the scheme there is an error pointed to by igor_omsk and the use of a cross-cable will lead to a USB failure. With a straight cable 100% works. (note gshamshurin )
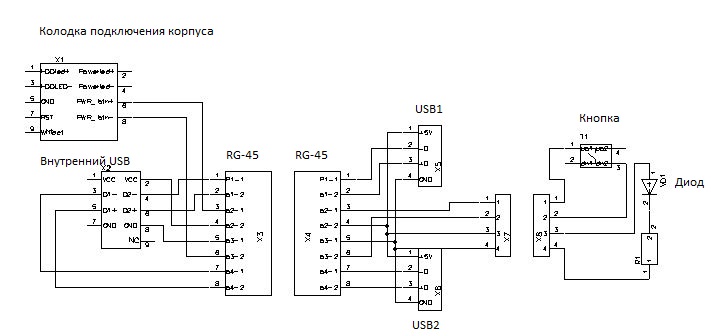
And how will we connect to the computer? To internal USB 2.0, of course. And the contacts of the power button, of course.
Development of the PCB - everything is simple here: first, I drove into the store for details, and then, without
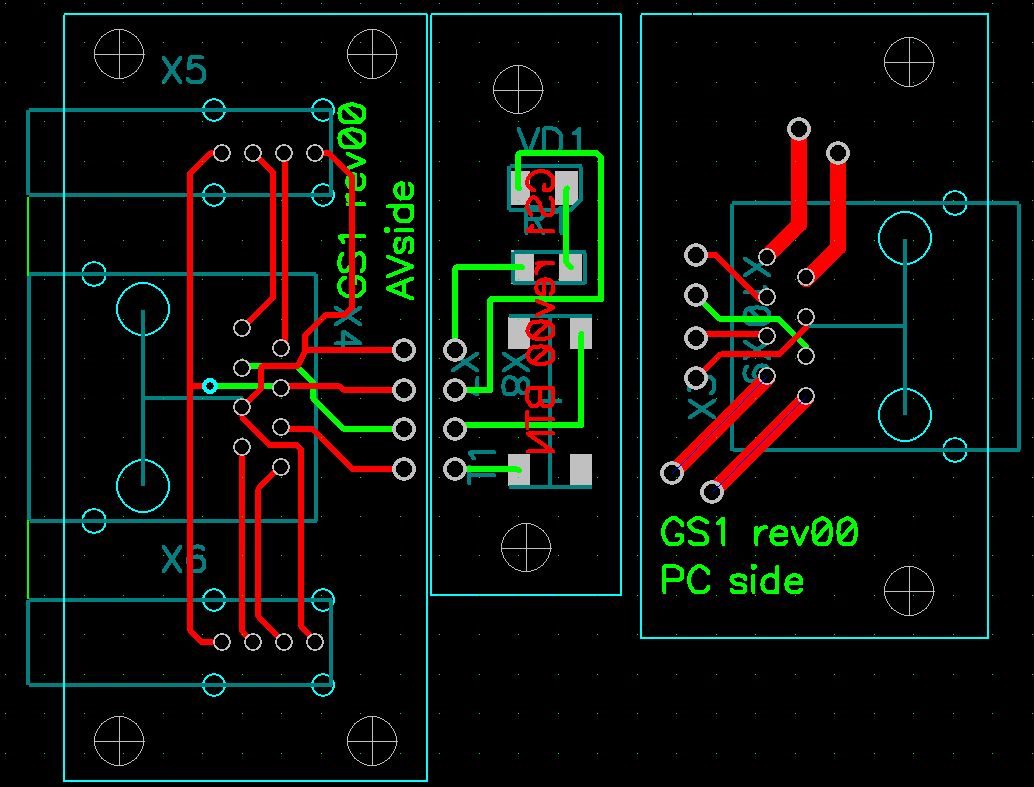
When ordering, I asked to place all three boards on one blank - this is more economical, one set of photo masks is cheaper than three. If the form factor of the “computer” side of the device was clear and determined by the dimensions of the rear body plate, I still didn’t fully represent the “user” side. Therefore, the connectors turned out on one board, and the indicator and the button on the other.

Here they are soldered technologically.
Development of the body of the product
Almost any "mechanical" CAD system like SolidWorks, Autodesk Fusion, KOMPAS, can do everything that is necessary. There are many materials on each of these programs. Solidworks even has a built-in tutorial with interactive lessons - not for long to understand, I’ll just write basic things that are not in the help programs for those who, in principle, have never encountered mechanical processing and do not know where to start.
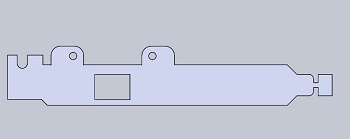
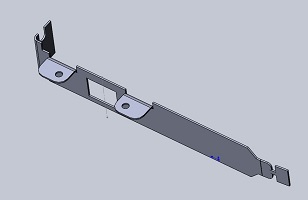
The query “pci-e bracket draw” in Google immediately gives the almost complete desired result for the “computer” side. Draw a bar, cut a hole. Manufacturing technology - laser cutting galvanized steel sheet and the formation of bends on bending machine.
Technology limitations and general design guidelines
The laser machine allows you to cut any shape of sheet metal, directly on the file in dxf format. For example, such:
But there is one recommendation - minimize the number of entries,%% username%. The most common types of lasers in order to make the next hole you need to turn off - lift your head - move - lower your head - turn on. Better use those long lines.
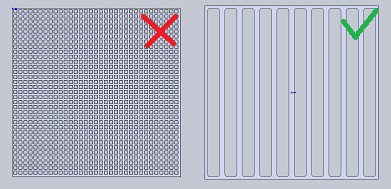
The area of the ventilation holes on the left and right is the same. For the left part will take two thousand rubles (if they take at all). The price of the right is a good word. Or weaving on beer.
After the part is cut, you need to bend. To get, say, such a detail
Leave the grandfathers vice alone - it is now fashionable to use CNC bending machines.
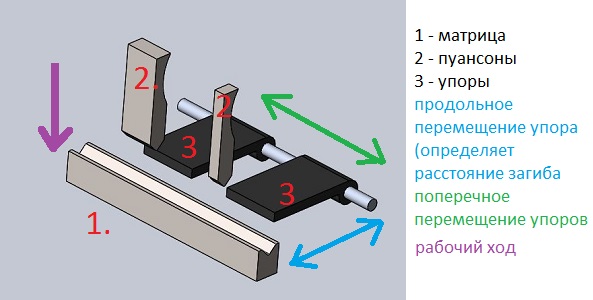
It works like this:
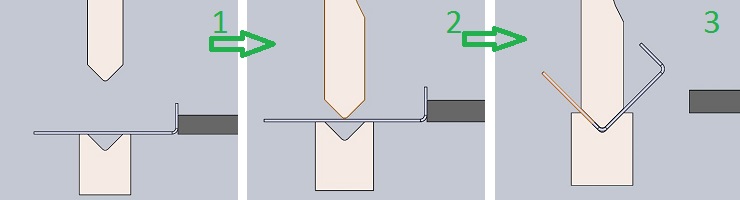
In step 1, stops are set to create the desired bend length. In step 2, the operator holds the part with his hands, the matrix touches the material. Step 3 - working stroke.
1. Remember the letter P. Not all enterprises have remote beams and not all will want to work with them.
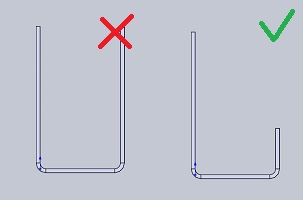
Try to make the side sticks shorter than the top. Otherwise, they may not bend - the edge will rest against the matrix.
2. Remember the stop.
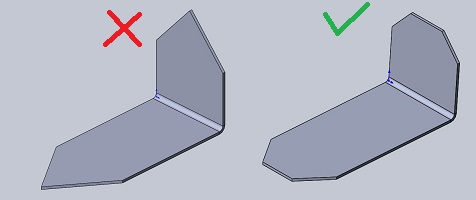
It is unlikely that the left part will be well bent - it touches the stop at one point, so the operator will have to catch the size “by eye”. But the right, which touches the edge - is easy.
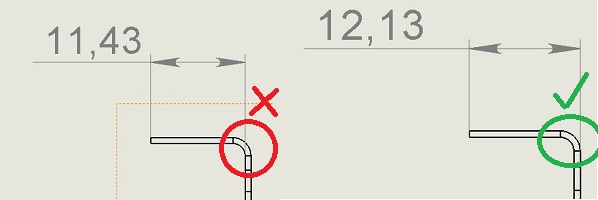
3. And once again about the emphasis - bend the edge is less than “10mm + thickness of metal” can

What to do if you need to bend less? That's right, technological support, which can later be broken off.
4. Round the edges.
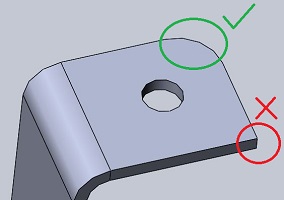
It costs nothing and does not complicate the design - but there is no risk of cutting yourself.
In what format to describe the bends? This format is called “drawing”. Make a good drawing in full compliance with the Standards and ESKD without special education
0. Give the details a meaningful name (“PCI-E Plank” is OK, “Detail14” is not very), indicate the required number directly on the drawing.
1. Specify outside dimension. Internal is difficult to measure.
2. Specify material and thickness.
3. Specify all significant sizes.
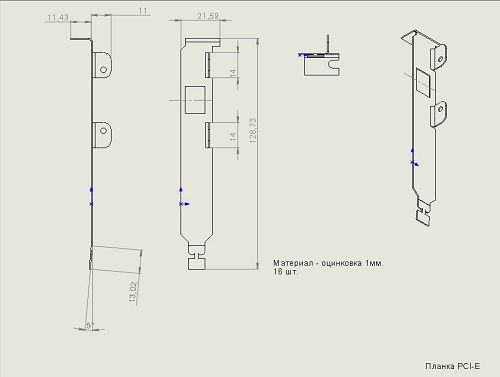
Here I specifically drew a typical novice drawing (a nightmare's nightmare).
And the dimensions here are not whole, which should be avoided. But a person who wants to get money for the hack will be sufficient, and we don’t need more.
b) Regarding the case itself - I love aluminum. And I also love - when a thing is made from a single piece of aluminum. We mill in one office. In the other we mill the bottom and the light guide.
It is a little about technology and the general recommendations about design.
1. Remember the size of the cutter. A large amount of material is easier to remove with a large milling cutter, thin elements - with a small one. Internal corner without rounding will not work.
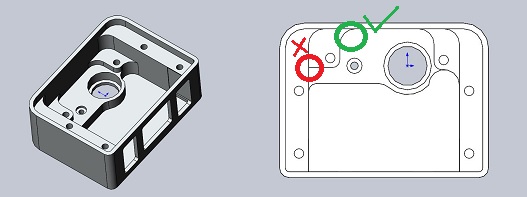
2. Minimize the number of settings and tool changes. Above - two installations (the main cavity and the wall with connectors) and one change of instrement (the main volume is selected with a 8mm mill, then - 2 mm).
3. On the finishing surface - it will look like this:
c) Aluminum housing-aluminum button. The button is easier to cut.
So turning. The simplest in terms of design technology. The most important thing to remember here is that the installation of the part is possible at both ends and to avoid complex undercuts that require special incisors.
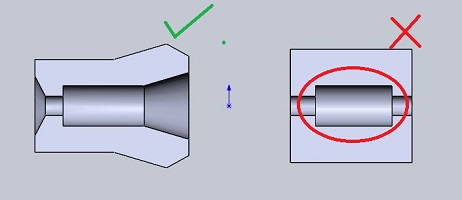
And do not sharpen huge washers. What can be made from a sheet on a laser - you need to make from a sheet on a laser.
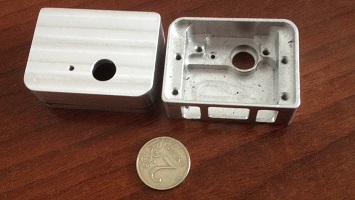
d) And now we give the weight of this mess in order: paint the bar with powder in black. Sandpaper remove large defects in the body. We carry the case and the button in sandblasting - more precisely, hydroabrasive processing by glass balls. It should turn out like this
We assemble the product and ... we understand that we flew with the dimensions, the button in the assembled form remains pressed. We put the washers under the board, collect and ...
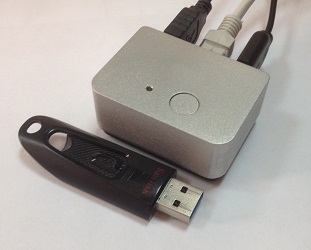
4. Experiencing. In the case of the Zalman Z1, the bar got up without problems. When using the cheapest 10-meter HDMI cable with Ali and the cheapest 10-meter Cat6 cable from the nearest store, the main peripherals (keyboard, mouse, monitor) work correctly, the difference with connecting directly with short cables is not. Flash drives with such a cable length with a non-USB pitch, of course, do not work. Either they are not determined, or they are determined, but they do not work :) Pressing the button tactilely is not perfect. But much better than
5. "So, with the design we will understand, everything is clear - and now where to look for people who are ready to embody it in the metal?"
- In Google. Pluses - you will be able to write documents. Cons - everything else. Your order is small, and nobody wants to do it. That is either expensive or bad, or expensive and bad.
- By acquaintances. If you directly know a person, this is good. If through someone, see the previous paragraph.
- In local professional forums. Cons - you probably will not provide the documents. Pluses - will do in most cases quickly and well.
- The only thing with which there will be no problems is painting. Automobiles paint in each gate and the color palette is impressive there.
Do not think that the high price somehow guarantees the quality or timing of the work. For 16 milled cases, I gave 8 thousand rubles - and what would you think, the second part of the work, that is, the buttons they still do to me. Since June. Although the money fell personally to the owner of the company personally in the hands. In order to get at least the hull - I had to go there five (five!) Times.
As a result, the buttons are inexpensive for me and turned the turner found through a forum from some factory during the day. Drawing on the mail - the next day meeting with the exchange of money for the result.
Hydroabrasive processing of the first button was done to me for free, in the presence and at the direction of a director of the company I did not know before, and the other buttons were made for very reasonable money and right in my presence.
In general, it is necessary to look for not a company, but an adequate person.
6. The final word: even if it seems to you that the device is designed to work (and even if it is really efficient), even if it seems to you that the device turned out beautiful (and even if it really turned out beautiful) - do not repeat my mistakes, run into production no more than 2-3 pieces. The buttons described in this article have 10 sets left. But what remains is a daily pleasing to the eye and a little consoling pride.
Successful to you projects!
All Articles